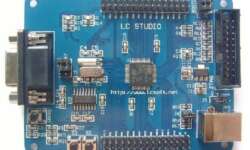
AVR DDS3 boards have arrived

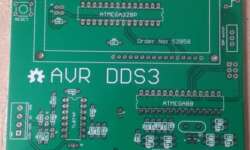
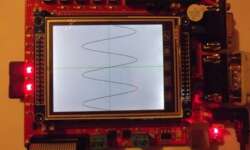
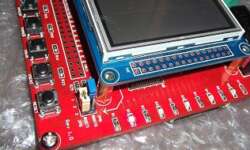
Finally, some updates on the AVR DDS3 signal generator. The circuit is practically done, and PCBs are made. I decided to go with two microcontrollers on board to make it more functional. One microcontroller, Atmega328P, is gonna be dedicated to user interface and signal generator control. The second Atmega88 is gonna be used for signal generators only. This will give un-interruptable signal output while changing parameters or simply doing signal sweeps.

Continue reading

Project demo on STM32F103RBT6 using GCC

STM32F103R board is a simple and easy development board to learn STM32 microcontroller programming. Its heart is an STM32F103RBT6 ARM Cortex-M3 microcontroller with 128K of Flash and 20K of SRAM memory. It can be clocked at the maximum 72MHz frequency and considered a medium-density performance line microcontroller. Other features include USB, CAN, seven timers, 2ADCs, and nine communication interfaces. The Development board has several excellent features to get started. First of all, it has an RS232 interface for communicating and accessing the bootloader. There also is a USB 2.0 full-speed interface connector that also can work as the power supply. Next is a JTAG connector to program microcontroller using tools like a J-Link adapter. Two pushbuttons and two programmable LEDs are hardwired to MCU pins alongside all I/Os connectors.

Continue reading

Harvesting energy with home made solar thermal collector

The nearest star from Earth is Sun. And it emits a massive amount of energy, which is free. No surprise, many people try to get most of it at a minimal cost. Photovoltaic solar panels still have low efficiency and yet are quite expensive. Every day we hear how their effectiveness is increased by introducing new technologies. Anyway, solar panels require direct Sun, which in some regions doesn’t appear very often. So how can we get this energy with almost no initial cost? The easiest way to do so is to build a solar thermal collector. You can find lots of high efficient commercial collectors. They look great and, at some level, works in the wintertime when Sun shines. I decided to go simpler. I need hot water only in spring, summer, and fall. In the wintertime, I burn wood to heat the house and so water. I usually boiled water using an electric boiler in the summertime, which generates excellent bills at the end of the month. No more… So I started this project, which is still in the testing phase. But seems to work fine. Let’s go through the build process to make a simple solar collector using…

Continue reading

Driving Graphical LCD with STM32F103ZET6

STM32F103ZET6 board comes with 3.2 inches graphical LCD which features an ILI9320 controller. Equipped LCD is capable of displaying 252144 colors when driven in 18-bit mode. We are going to run it in 16-bit mode, so we are limiting it to 65K colors. LCD driver is based on the existing code found on the internet, originally developed for the STM3210E board. Only minor modifications were needed, like assigning the proper control pins.

Continue reading

Connecting STM32 USART to standard I/O streams in GCC

In many situations, when working with STM32 microcontrollers, you will want to output text strings. There is no need to write specialized functions that output specially formatted strings as it is hard to keep up with various cases. It is convenient to use standard I/O streams and their library functions that allow sending formatted data streams. Arm GCC toolchain comes with the newlib C library from Redhat, so it isn’t specially designed for the embedded toolchain. To use stdio functions, we have to take care of several syscals so-called “stub functions.” These functions usually are provided by operating systems like you would write C programs in Windows or Linux. In our case, we aren’t using any OS, so to avoid error messages while compiling, we have to provide these function declarations where most of them are dummy implementations. It’s not something new pick one that you find on the internet. I noticed that it was written for STM32 Discovery. I named it newlib_stubs.c and placed it in the startup directory. Among system functions implementations like _write(), _fstat(), etc., there are also USARTs assigned to standard streams:

Continue reading

Interrupt based button read on STM32F103ZET6 board

In the previous example, we implemented a simple demo program that reads buttons by continually checking their status in the main program loop. This isn’t an efficient and convenient way to do that. Imagine your application has to do lots of tasks, and in between, you also need to check button status – mission becomes impossible unless you use interrupts. In this part, we briefly introduce to STM32F10x interrupt system and write example code where LEDs and buttons are serviced within interrupts. ARM Cortex-M3 microcontrollers have an advanced interrupt system that is pretty easily manageable. All interrupts are controlled inside Nested Vectored Interrupt Controller (NVIC), close to the Cortex core, to ensure low latency and robust performance. Main features of NVIC include:

Continue reading

Implementing buttons on STM32F103ZET6

Last time we have made a good starting point with setting up a project template for the STM32F103ZET6 development board using GNU tools. Using the same project template, we can move forward and start programming other elements. This time a quick note about adding a button library. This is a modest implementation that initializes port pins and then reads their status. The Development board is equipped with four user-programmable buttons named WAKEUP, TAMPER, USER1, and USER2. We will not care about the meaning of names; use them as general-purpose buttons for now.

Continue reading

Driving LEDs with LPC2148 microcontroller

The LPC2148 development board is a mighty board with an ATM7TDMI series microcontroller considered an old guy compared to Cortex ones. But still, these are widely used and are powerful. The Development board has some handy features installed. 12MHz crustal allowing to run the processor at full 60Mhz speed. Couple RS232 ports, VGA connector, PS/2 connector for keyboard or mouse, 20-pin JTAG, SD/MMC slot, USB B-type, 8 LEDs driven with a serial-in parallel-out shift register, 2×16 LCD, buzzer, audio jack with an amplifier, two programmable buttons, and 256Kb of I2C interfaced EEPROM. The microcontroller itself has 512KB of internal flash and 32+8KB of RAM. All ports are accessible, and any external hardware can be disconnected with jumpers. This is a great board for prototyping and end application.

Continue reading

LED blinky demo on STM32F103ZET6 development board

I found some time to play with the STM32F103ZET6 development board and decided to set up a simple project for it. The trickiest part of this is to set up a project environment that would serve as a template for the following developments. Many ARM developers chose the CodeSourcery Lite edition toolchain. It has full command line functionality – this is what we usually need. If you want some alternative – you can select gnu yagarto ARM toolchain, which is also great and free. No matter which tool you select, the code will work on both. Let’s stick to CodeSourcery. Just download it and install it on your PC. As we said Lite version supports only command-line tools – we need an interface for it. Eclipse IDE is one of the favorite choices, so that we will grab this one too. Yagarto website has an excellent tutorial on how to set up the Eclipse IDE in a step-by-step manner. We won’t go into details with this.

Continue reading

FreeRTOS on AVR with external RAM

AVR microcontrollers aren’t the best choice to run the FreeRTOS scheduler due to low on-chip RAM. Atmega128 has only 4K of RAM, so this limits the FreeRTOS functionality to very basic. This problem can be solved by adding extra RAM, which may be connected to an external memory interface. We have already built an external memory block of 8K previously to test it with FreeRTOS applications. Let’s continue with our previous code, which runs several simple tasks (button state reading, LCD output, and LED flash), and we can add more to it. We are going to set up an external RAM for storing heaps. This will allow the storage of large data buffers without worrying too much about heap and stack overlaps.

Continue reading