Get in to makers world with Elegoo Mega 2560 Project The Most Complete Ultimate Starter Kit

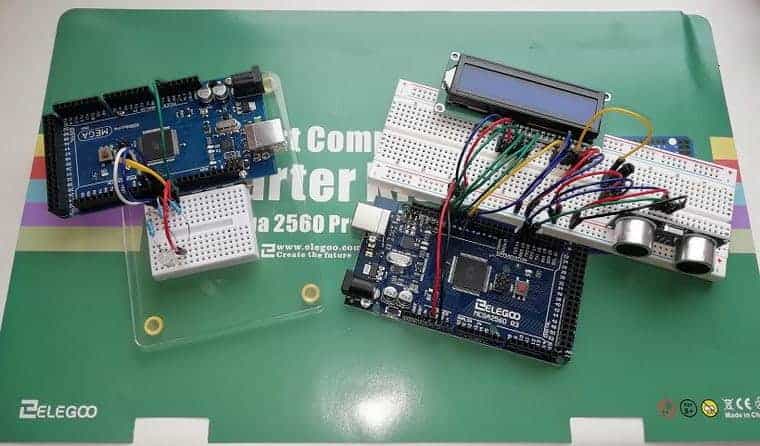
If you are just a beginner in electronics or just started learning Arduino – it is easy to get lost among hundreds of boards, electronics parts, and tutorials. You may already have an Arduino board to play with but still feel that there is no fun in learning as you need to search for suitable external parts and look for guides on how to solve specific problems. We can all agree that learning new things in a systematic and organized way gives maximum benefit. One of the easiest ways of learning electronics and programming microcontrollers is to start with Arduino. It is an open-source board that comes along with the development platform (IDE), where you can start writing and executing programs right away. Despite its simple look, Arduino is a very powerful microcomputer capable of performing different complex tasks. It may read a wide range of sensors, process data, and output results to displays and LEDs, run motors and servos. The limit is only your imagination. The maker communities on the internet already have built millions of projects around Arduino. There are many types of Arduino boards available for different purposes. They come in various sizes featuring different processors and…

Continue reading

Gearbest review: Arduino Mega2560 and LCD keypad demo project

Arduino is an excellent platform for fast prototyping and building projects. But probably one of the best things here is that Arduino layout allows plugging hundreds of standard shields. Today you can probably find any type of sensor, displays, driver included in to shields. This is where comes the real power of using Arduino. Gearbest have supplied us with a great combination of commonly available products, including Arduino Mega2560 and LCD keypad shield. Arduino Mega2560 comes with powerful AVR ATmega2560 microcontroller featuring 54 I/Os, 256KB flash, 4KB of SRAM, and 4KB of EEPROM. It has standard Arduino header layout extended with tens of additional that are not occupied by shields. They can be successfully used with additional gear.

Continue reading

How to drive stepper motor with Arduino motor shield

driwing stepper motor with arduino motor shield

Previously we have driven servo and DC motor using an Arduino motor shield. It is easy to interface with these motors and write the code. This time we get to the stepper motor control and discover the full potential of the motor shield. Stepper motors are more complex devices than servos or DC and require some knowledge before running them. You cannot expect to plug some voltage and see it spinning. Their primary purpose is precise stepping that gives control of how much the motor is turning. You can find a stepper motor in any printer which feeds paper incrementally – and this is where you can get one. Disk drives are another great source to scavenge. We will not get into stepper motor working theory. Do your research before trying to run one.

Continue reading

Pressure-less solar collector controller prototype

It’s been over three months since the solar collector was installed. I decided to build a controller by myself. And it turned out that it stayed in the prototype stage. So I put it into the enclosure and left it like is. So far, it works fine – water is hot every day, so I have nothing more to expect. I did not capture enough pictures of the build, but I think I will share what I have. In the forum thread, you probably saw what type of system I was building. As I mentioned, the solar collector is cheaply made in China and is pressureless. They usually come with a unique controller which takes care of the refilling tank, ensuring protection from water freezing and other individual scheduled routines. A pressureless collector usually is first filled with water which heats, and then it is used (mixed with cold). The initial test shows that when the collector is in direct sun, it boils what leads to heater elements’ calcification. Overall lifetime reduces and so efficiency.

Continue reading

Cheap Arduino compatible boards are same as original

Probably you have noticed that Arduino is spread worldwide. It would be ridiculous to see one manufacturer producing them. The Arduino group produces an original board that is named Arduino. This is their trademark. But being an open-source product, Arduino has become popular in almost all workshops, so demand is enormous. Since building plans are public, other electronics manufacturers started building Arduino-compatible boards. These are the same Arduino boards but with Arduino’s name and logo removed. It is 100% compatible with standard Arduino that works with software tools, extensions, and modules.

Continue reading

Test run of VFD display using Arduino

Among my electronics junk, I found a VFD (Vacuum Fluorescent Display) display and wanted to make sure it still works and can be used in projects. It’s a 16T202DA1E display manufactured by Samsung. It can replace the standard HD44780 based liquid crystal display out of the box. First of all, it only requires a 5V supply. The voltage step-up circuit for lighting fluorescent display is already on board. The controller accepts the same commands as any 2×16 LCD does. The pin-out of the display is as follows:

Continue reading

Testing LCD keypad Shield for Arduino

arduino lcd keypad shield

Recently I’ve got an Arduino LCD keypad shield. I haven’t decided yet where it will be used. But why not plug it into an Arduino board and see it working. The shield was initially introduced by DFRobot, who has some cool open-source stuff, including robotics-related. This LCD keypad shield is a cheap and convenient solution for adding 2×16 LCD and five push buttons (+1 reset) to Arduino design. LCD here is interfaced using 4-bit mode and occupies 4 (D4), 5 (D5), 6(D6), 7(D7), 8(RS), 9(E), and ten digital pins. Pin 10 is used to control the LCD backlight through the transistor key. All five buttons are connected to a single Analog pin 0 using a resistor-based voltage divider. This lets us keep other pins for general use. The shield is designed to work with 5V based boards.

Continue reading

Understanding and interfacing LDR – light dependent resistors

light dependent resistor

LDR (Light Dependent Resistor) is a simple, cheap electronic device. This is a resistor in which resistance varies depending on light intensity. You’ve probably seen typical LDR in some projects where light intensity must be considered. They can activate light switches and alarms, adjust display brightness, and more. Light-dependent resistors can be of different types. They vary in light-sensitive material used. Visible spectrum LDR is made using Cadmium Sulphide (CdS) or Cadmium Selenide (CdSe). This material is sensitive to the wavelength range from 400 – 850nm. For the near-infrared spectrum (1μm – 3μm), there are PbS or PbSe materials used. For the deeper infrared range (3μm – 1000μm), there are InSb and InAs.

Continue reading

Drive DC motor using Arduino motor shield

arduino motor shield with dc motor

This is a continuation of the previous post where we have tried to run a servo using an Arduino motor shield. This was a simple task to do with the Arduino Servo library. Today we will push things a bit forward and drive the DC motor using the same motor shield. This motor shield can run small DC motors that require less than 0.6A of current and operating voltage is less than 25V. In my drawer, I found a small 12V motor that will fit this demo. Before we begin programming, we need to connect the motor to the Board. We are going to use the M1 connector.: Since the motor requires a 12V power supply, we are going to use an external power supply. It can be connected to the External power screw terminal. Be sure to remove the jumper as well.

Continue reading

Testing Arduino motor shield with servo motor

Arduino motor shield

Recently I’ve got an Arduino motor shield. It is based on ladyada first mshield circuit. It uses two famous L293D quadruple half-H divers. It is a cheap and reliable shield to drive various motors. These can be two hobby servo motors, four bidirectional DC motors, or 2 (unipolar or bipolar) stepper motors. The load current is limited to L293D chips. The specification says that each channel can provide a constant 0.6A and peak 1.2A. There is also a thermal shutdown to prevent the circuit from damaging. Motors can be externally powered using a voltage range from 4.5V to 36V. Each motor control channel is pulled down with a resistor to disable any motor at power-up. In this post, we are going to try servo motor control. There are a couple of connectors on the motor shield where you can connect two servo motors using a standard 3 wire connector (GND, VCC, and PWM).

Continue reading