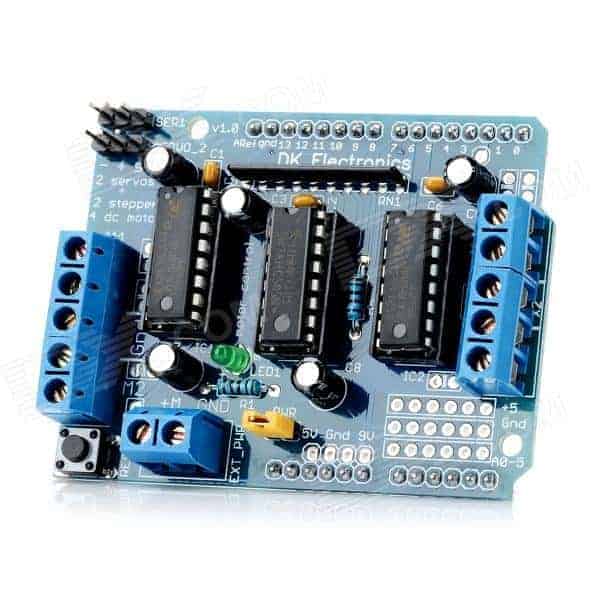
Recently I’ve got an Arduino motor shield. It is based on ladyada first mshield circuit. It uses two famous L293D quadruple half-H divers. It is a cheap and reliable shield to drive various motors. These can be two hobby servo motors, four bidirectional DC motors, or 2 (unipolar or bipolar) stepper motors. The load current is limited to L293D chips. The specification says that each channel can provide a constant 0.6A and peak 1.2A. There is also a thermal shutdown to prevent the circuit from damaging. Motors can be externally powered using a voltage range from 4.5V to 36V. Each motor control channel is pulled down with a resistor to disable any motor at power-up.

In this post, we are going to try servo motor control. There are a couple of connectors on the motor shield where you can connect two servo motors using a standard 3 wire connector (GND, VCC, and PWM).
There are two options for powering the motor. You can power it from an Arduino supply. This convenient when the motor is low power and Arduino supplied current is enough to drive the load. If you use a higher power motor, then you should attach external power to the terminal and remove the jumper that connects motor power to Arduino:


The Servo motor is controlled using a PWM signal. The rotation angle can be changed by changing the PWM duty cycle. Usually, the PWM frequency is 50Hz (period 20ms). Now, what about rotation angle and pulse width.? Often there are the following scenarios:
- 0º angle – 1ms pulse width;
- 90º is neutral – 1.5ms pulse width;
- 180º maximum angle – 2ms.
As you can see, pulse width varies in a small range compared to the PWM period. Let’s try to run a simple Arduino program to get the motor shaft turning Arduino motor shield Servo1 channel is attached to Arduino D10 pin. Controlling servo motors with Arduino is easy, and you even don’t need a motor shield for this. Anyway, the motor shield is convenient because there are already pins available where the standard servo connector fits. And so, to drive a servo, you only need to include a servo.h library into Arduino code:
#include <Servo.h>
//create servo object
Servo servo1;
void setup() {
  //attach servo1 to pin 10
  servo1.attach(10);
}
void loop() {
while(1){
  //0 position
  servo1.write(0);
  delay(1000);
  //90 degrees
  servo1.write(90);
    delay(1000);
 //180 degrees
  servo1.write(180);
  delay(1000);
 //180 degrees
  servo1.write(90);
  delay(1000);
  }
}
As you can see first, we create a servo1 object from class Servo.
Servo servo1;
Then we assign pin 10 to it where servo motor is connected.
Servo1.attach(10);
And that’s it – we can start using servo motor right away by using the command:
servo1.write(angle);
The Servo library allows setting servo motor rotation angle from 0 to 180 in degrees. In this example program, we rotate the servo motor 90º backward and forward every second.

There are other functions available in the servo library that can be used. We used a couple of those – attach() and write(). There is also a detach() command that allows a free pin from servo control and uses it as standard pin-like for using analogWrite(). If you don’t like to control the servo motor by writing angular values, you can use the writeMicroseconds() function instead of write(). Converting the angle to microseconds is easy when we know that the 0º angle is 1ms or 1000us. Then instead of writing servo1.write(0), we can write servo1.writeMicroseconds(1000), and this will be the same. This command is also useful when you get a bit different servo motor, where signal timing won’t match common practice. Then you can set a custom pulse length to match the angle. The last command in the servo library is read(). It simply returns the last angle sent with the write() command. As we can see, controlling servo motors with an Arduino motor shield is easy. And you don’t need any external libraries for this. Next time we will try to run DC motor and stepper motor.


Hi there ,
Its great article that you have written. Its really helpful.
I am doing a final year project in which I m using this motor shield a motor with higher power and I am not able to understand which jumper are you talking about in these lines.
“If you use higher power motor, then you should attach external power to terminal and remove jumper that connects motor power to Arduino”
Please help me with this. I shall be grateful to you.
Thankyou