
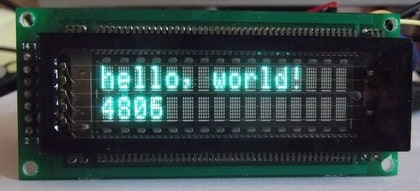
Among my electronics junk, I found a VFD (Vacuum Fluorescent Display) display and wanted to make sure it still works and can be used in projects. It’s a 16T202DA1E display manufactured by Samsung.
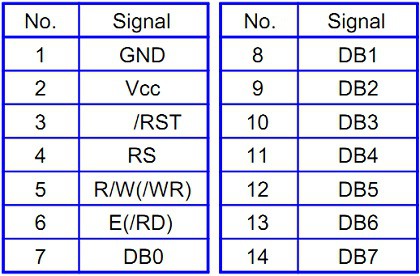
It can replace the standard HD44780 based liquid crystal display out of the box. First of all, it only requires a 5V supply. The voltage step-up circuit for lighting fluorescent display is already on board. The controller accepts the same commands as any 2×16 LCD does. The pin-out of the display is as follows:
The display can be connected either in 8-bit or 4-bit mode. Probably the most significant advantage of using VFD is its high contrast and crisp view. Lots of hobbyists prefer using them in high-end projects like audio amplifiers or message panels. But these benefits require some sacrifice – they draw more power. If a 2×16 LCD requires about 2-3mA, this adequate VFD requires between 130mA and 200mA. So this doesn’t look attractive when talking about battery-operated gadgets.
Here is a simple test using Arduino. The code is already available in the samples category. All is needed to connect the display to proper pins and give it a go.

* LCD RS pin to digital pin 12
* LCD Enable pin to digital pin 11
* LCD D4 pin to digital pin 5
* LCD D5 pin to digital pin 4
* LCD D6 pin to digital pin 3
* LCD D7 pin to digital pin 2
* LCD R/W pin to ground
It gives a “hello world” message on the first line and counts seconds on the second line of the display.
So where you want more brightness and don’t afraid of more significant power consumption, then it’s a great choice.
Arduino code:
// include the library code:
#include <LiquidCrystal.h>

// initialize the library with the numbers of the interface pins
LiquidCrystal lcd(12, 11, 5, 4, 3, 2);

void setup() {
  // set up the LCD's number of columns and rows:
  lcd.begin(16, 2);
  // Print a message to the LCD.
  lcd.print("hello, world!");
}

void loop() {
  // set the cursor to column 0, line 1
  // (note: line 1 is the second row, since counting begins with 0):
  lcd.setCursor(0, 1);
  // print the number of seconds since reset:
  lcd.print(millis()/1000);
}
Hello thanks for the info,
I already using this vfd with the matrix orbital arduino emulator for lcdsmartie.
It works but I have the information of the 2 lines in the first…the second line wont work.
Could you help me? regards daniele