
It’s been quite some time since my Raspberry Pi Model B arrived. All I’ve done is tried to run several things, blink GPIO with examples found on the Internet, set up a desktop computer for my daughter with TuxPaint. I never was a big fan of Linux; on the desktop computer, I always use Windows for my daily tasks.

With cheap single-board computers like Raspberry Pi, people looked at Linux from a different perspective. We can notice an increased interest in Linux, how to do this, and this. Who works with Linux long time? It is just another computer where they can work with it and make cool things right away. But for us like me, it’s a good chance to get to know Linux better and learn a few tricks.
There are already tons of information about the Raspberry Pi computer. Practically anyone can find an easy step-by-step guide to set up a Raspbian image, set basic settings, and control it either through a terminal screen or a casual computer with a monitor, keyboard, and mouse. From my experience, it is a bit too slow to run desktop applications with a graphical interface. For instance, loading, TuxPaint takes a long time and is not very responsive. But for embedded applications or hardware optimized XBMC media center, you can get great results.
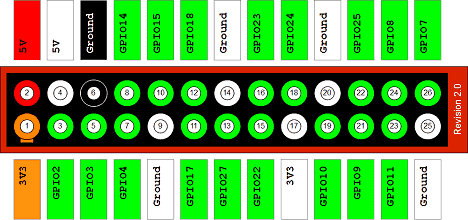
As I mentioned, Raspberry Pi is great for embedded applications. Besides all computer interfaces like LAN, USB, Audio, HDMI, and RCA, a GPIO header makes it a powerful prototyping platform.
Linux takes care of Internet things automatically, and with few commands, you can control real-world applications from the web and so on.
Raspberry Pi has a couple of ways of attaching a monitor or other display (HDMI or RCA). You can attach a monitor, keyboard, and mouse to configure and use it. But in my opinion, this is not what it is designed for (unless you use it for playing media or gaming). It might be placed remotely for embedded applications, and the only thing that makes it accessible is internet cable or even WiFi. So from the beginning, I will use it that way. This will help me get more comfortable with terminal commands and the whole idea of using Linux OS.
In order to access to Raspberry Pi through terminal screen you need
- Router with running DHCP;
- A desktop computer attached to the same router;
- Raspberry Pi attached to the same router.
Power up Raspberry Pi, and then what is left is to figure out what IP address is given to it. The best way is to open the router and find devices connected to it. Depending on your router, results may look different. Normally you will see a device named ‘raspberry pi.’ Write down its IP address.

Then if you are a windows user, it is best to use the PuTTY terminal application. Enter the IP address, save it for the next use and click open.
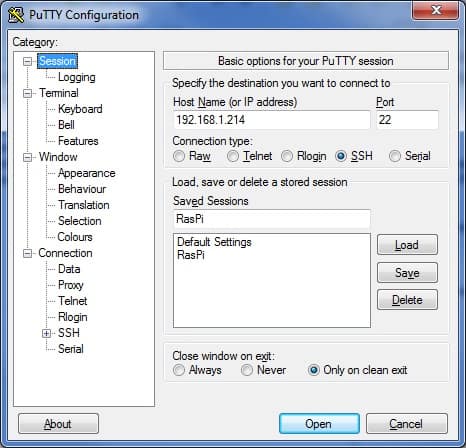
In a few seconds, you will get a black screen that prompts for login. Enter pi as user name and raspberry as password. You won’t see feedback when typing the password, type it blindly and hit enter. And here you are – connected to Raspberry Pi remotely through SSH. From here, probably we won’t go about how to configure it for the first time – there are plenty of start-up guides on how to do this. If you feel uncomfortable doing this from the command-line tool, probably for the first run, it is better to connect the monitor and do this with the keyboard and mouse attached.
When doing from terminal screen just type command:
sudo raspi-config
Hit enter, and you will see a nice terminal pseudo-GUI where you can navigate and configure different parameters like locale, keyboard mapping, and more. The first step you want to do is select the ‘expand_rootfs’ setting. It takes care of expanding the file system to use the maximum size of your SD card.
Raspbian ‘wheezy’ is a Debian Linux-based operating system. So basically, all tutorials and commands from Debian apply to Raspberry Pi. Raspbian already has a bunch of pre-installed applications that can be used right away. If you want to know what programs are here, type the following command:
dpkg -l
It lists all installed programs and their versions. The community constantly updates programs, so it might be a good practice to run an update command that will download newer versions of outdated applications.
sudo apt-get update
It simply scans through the list of download mirrors and builds a list of upgradable programs and modules. After this, you can run.
sudo apt-get upgrade
It will show the list of applications along with data archive to be downloaded;

Type Y and upgrade will perform. It takes some time to finish. After this, you will be sure that you are using the newest versions of programs and OS. Next time we will get closer to basic terminal commands that are the main tool of dealing with Linux.