The LPC2148 development board is a mighty board with an ATM7TDMI series microcontroller considered an old guy compared to Cortex ones. But still, these are widely used and are powerful.
The Development board has some handy features installed. 12MHz crustal allowing to run the processor at full 60Mhz speed. Couple RS232 ports, VGA connector, PS/2 connector for keyboard or mouse, 20-pin JTAG, SD/MMC slot, USB B-type, 8 LEDs driven with a serial-in parallel-out shift register, 2×16 LCD, buzzer, audio jack with an amplifier, two programmable buttons, and 256Kb of I2C interfaced EEPROM. The microcontroller itself has 512KB of internal flash and 32+8KB of RAM. All ports are accessible, and any external hardware can be disconnected with jumpers. This is a great board for prototyping and end application.
I decided to put up a simple project. And yes, you guessed – LEDs again. Blueboard website provides code examples. Most of the drivers are already written this makes our life much easier. Only minor modifications will be needed as their code is based on (or related to TNKernel real-time kernel). For now, I just want to get rid of RTOS based code and make a simple application.
Our project will be based on the same tools as we used for the STM32F103ZET6 development board. So no additional preparation is needed – open Eclipse (CodeSourcery must be installed too). The only thing you will need is a different firmware flasher, as LPC2148 is an NXP product. There is a great program called Flash magic that uploads compiled code by using the build in the bootloader.
Project setup is nothing more than a collection of files collected from various sources. These include linker scripts, start-up codes, makefile. You can find board drivers on the NGX website within example code.
[You can download project package here that strobes all 8 LEDs here: LPC2148LED]
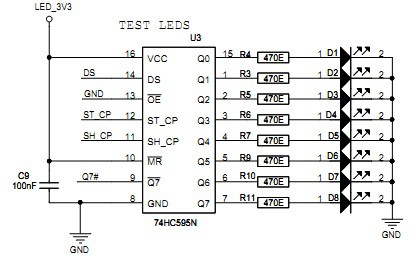
Let’s see how these LEDs are controlled. As we mentioned above, LEDs are connected through serial to a parallel shift register, which is controlled via SPI interface:
For this, we are going to need to drive the SPI peripheral of the microcontroller and also the drive register itself so we could access individual LEDs. For this, we must include spi.h library that was already in the example package. Originally there were separate source files for 74HC595N register and led. But this seems unnecessary while register and LEDs come along, so I simply merged those libraries into led.h, and made a little cleanup to get rid of few RTOS based functions.
After preparation, we can write a simple application that gives strobe effect on LEDs:
#include "type.h"
#include "hardware.h"
S32 main(void)
{
  HardwareInit();
  test_leds();
  while(1)
  {
      leds_on();
      delay(10000);
      turn_off_all_leds();
      delay(190000);
  }
  return 1;
}
You can a HardwareInit() function from hardware.c, which takes care of setting up a PLL multiplier where 12MHz crystal frequency is multiplied to 60MHz that clocks MCU core. SPI peripheral is initialized here too.


