
Tiva C series TM4C123G (MCU:TM4C1233H6PM)Launchpad is updated version of Stellaris Launchpad LM4F120 (MCU: LM4F120H5QR). Practically this is due to TI’s choice to change the name of the product line. Such action led to some confusion, especially for software developers. This means that software libraries had to be renamed, software tools adapted, and so on. Since this work is most renaming things from one point, this is an easy task; from another point, it may be tricky to check all corners. So if you just into Texas Instruments ARM Cortex microcontrollers, it is better to start with the Tiva C series and forget Stellaris. Otherwise, this might get confusing to switch from one to another.
At the moment, TivaWare 1.1 still has some issues due to migration, but most things should work fine. Let’s try to create a project template for Eclipse IDE and Sourcery Codebench Lite GCC compiler tools. First, you need to download and install Eclipse with CDT C/C++ tools (Eclipse Indigo includes this). Next, you need to install the latest Mentor Sourcery Codebench Lite. Also, download and extract TivaWare for the C series, where all libraries and examples are located. To Flash microcontroller, download LM Flash Programmer. Other materials and introduction videos are here. So it would help if you had everything except CCS.
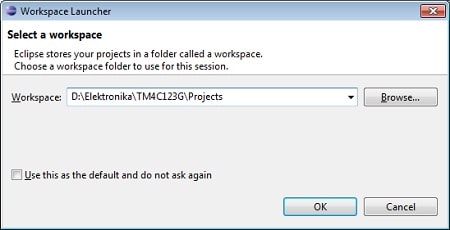
Lets start putting template together. First launch Eclipse and select workplace where project will be created:
Now we create a new project by selecting File->New->C Project and in project type select Executable->Empty project-> Cross GCC:
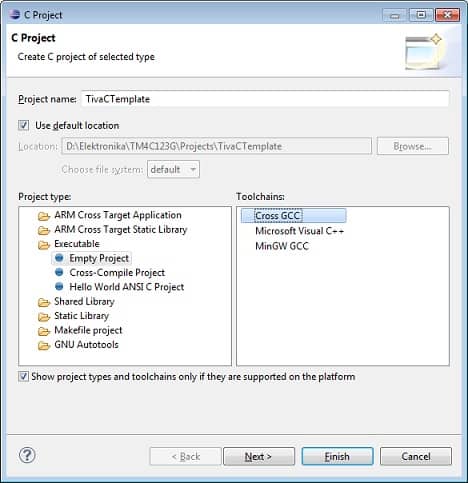
Lets name it TivaCTemplate.
Then click Next and if second screen click Advanced settings… button:
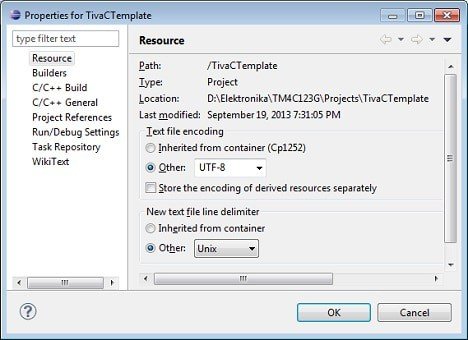
Under Resource property select Text file encoding as Other->UTF8 and New text file line delimiter as Other->Unix:
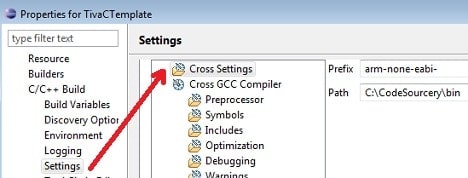
Next, go to the C/C++ Build branch and select Settings. Go to Cross Settings and in prefix type in arm-none-eabi- . As a path you may also browse to sourcery bin folder:
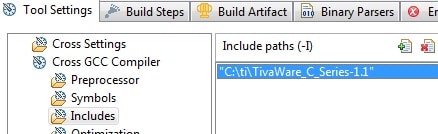
While you are in Settings go to Cross GCC Compiler → Includes and add path to TivaWare folder which by default should be installed to “C:\ti\TivaWare_C_Series-1.1”:
Then follow to Miscelaneous branch and in Other flags filed you will find -c -fmessage-length=0. Append following to the end: -mthumb -mcpu=cortex-m4 -mfpu=fpv4-sp-d16 -mfloat-abi=softfp -ffunction-sections -fdata-sections:

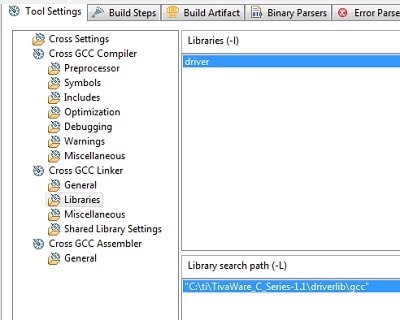
Now let’s add the TivaWare driver library. For this in the same window, go to Cross GCC Linker->Libraries and add the driver. And in Library Search path add library location which is at “C:\ti\TivaWare_C_Series-1.1\driverlib\gcc”:
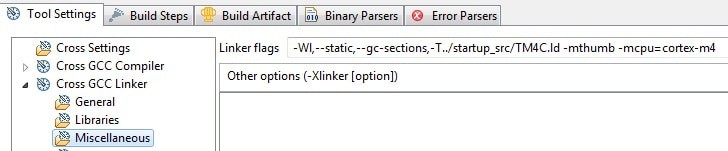
While in Cross GCC Linker go to in Miscellaneous branch and enter Linker Flags:
-Wl,--static,--gc-sections,-T../startup_src/TM4C.ld -mthumb -mcpu=cortex-m4
In same window go to Build Steps tab. In Post-Build steps field enter:
arm-none-eabi-objcopy -O binary ${ProjName}.elf ${ProjName}.bin
In description you may enter “Generate .bin file from .elf”:
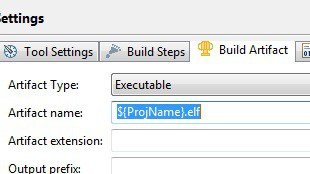
Then follow to next tab called Build Artifact and append to Artifact name .elf so you had ${ProjName}.elf :
Then you can click Apply, then OK and Finish to create project.
The empty project should be visible in the project tree. Before we start running examples, we need to take care of two important files: startup and linker script. Since the microcontroller is the same as in the Stellaris launchpad, we can use the same files. As a starting point, I’ve chosen the Scompo template for launchpad, where startup and linker script files are ready to go. From this template, we take LM4F.ld and LM4F_startup.c and rename them to TM4C.ld and TM4C_startup.c. In the project tree, let’s create a new folder called startup_src and import those two files here:

Just for quick test import blinky.c file from “C:\ti\TivaWare_C_Series-1.1\examples\boards\ek-tm4c123gxl\blinky”:

And try to compile. If build is succesful you should see TivaCTemplate.bin file in release folder.
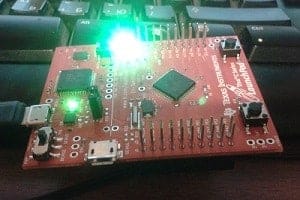
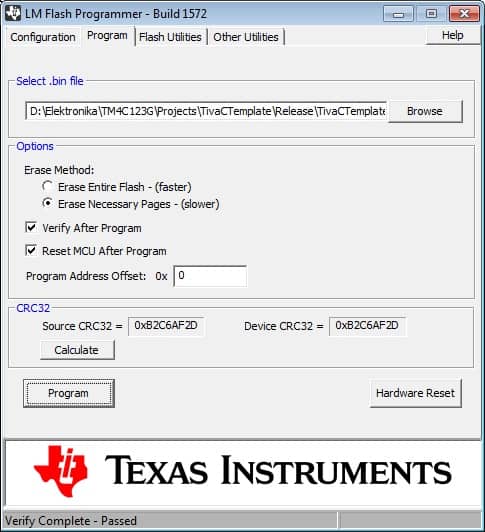
To flash Tiva C Launchpad, just run LM Flash programmer software, browse to generated TivaCTemplate.bin file and click the Program button. You should see a blinking LED immediately.
You can alternatively add LM Flash Programmer to Eclipse as an alternative tool called from the menu.
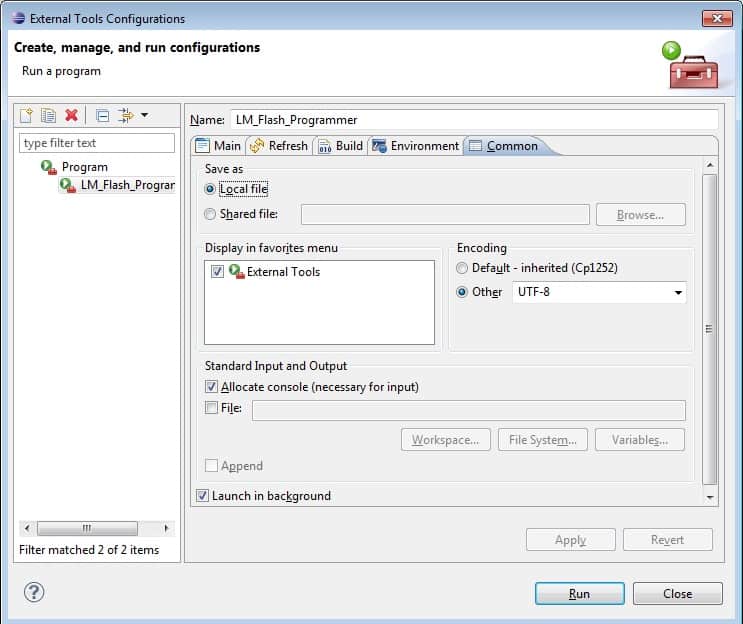
To make this possible, go to Eclipse menu Run->External Tools->External Tools Configurations and enter the following:
First of all, Enter the name of your item like “LM Flash Programmer.” Under Location, browse to Installed LMFlash.exe file “C:\Program Files (x86)\Texas Instruments\Stellaris\LM Flash Programmer\LMFlash.exe” that has to be invoked. Then Browse Workspace to add the working directory “${workspace_loc:/TivaCTemplate/Release}.” And under Arguments, enter what has to be flashed. Our binary file consists of a Project name with a .bin extension. So ${project_name}.bin works fine.
Then go to Common tab and select External Tools under Display in favorites menu.
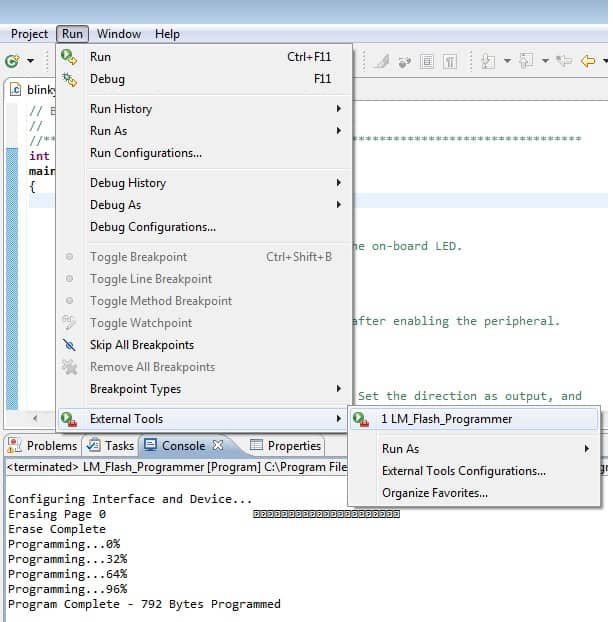
Now next time you select Run->External Tools->LM_Flash_Programmer you start programming immediately in background mode:
I hope you get your free GCC project up and running. Please comment if you notice an error in text or are stuck someplace. Download Tiva C template here: TivaCTemplate.zip
Great introduction! Thank you!
There is a little problem in the ‘Cross GCC Linker’ flags. On the webpage for some curious reasons the static and gc-sections flags start with longdashes which is wrong, GCC drops errors. On the screenshot the values start with doubledashes which is correct.
Thank you for noticing this. While posting, dashes were OK, but then editor merged two dashes in to long one.
It is fixed now.
Hey
Your guide was really good to me, thanks!
After some troubles i’ve got this working on my toolchain
Could i suggest some points?
– I have never worked with the Sourcery Codebench before, so this was a bit hard to find the correct version, i only figured out which one was the correct because the next steps was saying about the “arm-none-eabi”, so maybe would be good indicate this in this step.
– In the step where you instruct how to configure the LM flash programmer launcher, i have made some changes in my config:
changed the working directory to:
${workspace_loc}${project_name}Debug
because the folder name changes according with the project name
added 2 commands to the arguments:
-v -r ${project_name}.bin
-v to verify after programming and -r to reset the board after programming
And i got one error while trying to use the LM flash programmer (version 1588) by the launcher:
“Failed to load dynamic library: ‘ftd2xx.dll'”
i have searched about but i didnt found why, the help of the program says that whe need to add one path to the environment variables of the Windows, but i fixed the error copping the DLL from one of the CCS folders to program folder.
Well, thats all, thanks again for the guide!
I there, i followed the step but when i try to build, i got this error:
http://pastebin.com/JL4w5Dnu
i’m totally lost…new in the world of compiler 🙁
Hello,
please look for me problem. Thank You.
http://postimg.org/image/53fuvihd9/
Hello,
please look for me problem. Thank You
http://postimg.org/image/53fuvihd9/
can you debug the same way you can in CCS with the disassembly view and the register views.