Recently I’ve received a Raspberry pi camera board. So decided to make a post about it.
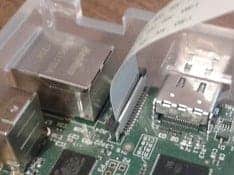
Raspberry PI comes with two interesting connectors onboard. One is between Ethernet and HDMI, and another is near GPIO. The one closer to the Ethernet connector is CSI (Camera Serial Interface) bus interface. This interface is common in mobile phones with cameras. This interface is specially designed for high data rates that are necessary for transferring pixel data.
The camera board is a small (25mm x 20mm x 9mm) board where a fixed-focus 5MP camera module (OV5647) is assembled. The camera connects to Raspberry Pi via a 15cm ribbon cable. Camera module is capable of producing 1080p images at 30fps or 720p at 60 fps and 640x480p at 60/90 fps. Obviously, such images and fps require a high-speed interface and processing. So CSI is connected directly to Raspberry Pi GPU, which can process images without ARM intervention. This is why the camera module is a much better choice than the USB camera, which occupies the main processor and slows down the whole system. GPU processing also benefits with fast H264 video encoding and JPEG compression capabilities.
The camera board ships with a ribbon cable already attached to it, so the only thing is left is to attach the other end to the Raspberry Pi CSI connector. The cable snaps into the connector pretty easily. First, remove the yellow transparent sticker from the connector and then loosen the brown clip. Attach ribbon cable with the blue side towards Ethernet connector and press down the clip. The connection seems to firm enough for carrying the thing around.
Hardware attachment is an easy task. Now we need to set up the camera for work. If you are using the newest raspberry distribution, then the most work is already done. If not, be sure to upgrade software and firmware to the newest version running the following commands through shell:
sudo apt-get update
sudo apt-get -y upgrade
sudo apt-get -y dist-upgrade
sudo rpi-update
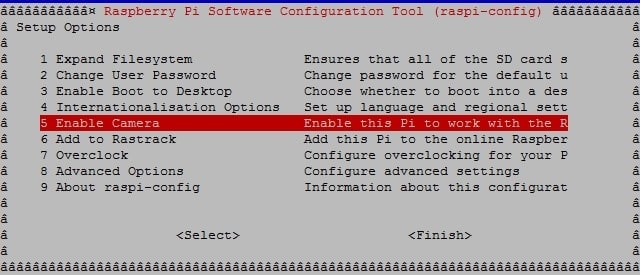
Execute each command or write a script to do this for you. Anyway, when you are done with updates, it’s time to enable the camera module. For this access configuration settings by executing next command in terminal:
sudo raspi-config
in configuration menu list select Enable Camera
Then confirm camera enable:
Then finish configuration and reboot Raspberry Pi. This is it. Now you can start playing around with the camera.
Camera control is accessed with two powerful commands raspivid and raspistill. The names are self-explanatory where raspivid is used for capturing videos while raspistill is for taking photos.
Lets start with capturing images.
If you type raspistill in terminal you will get all information and available options regarding it.
For instance you can capture an image and store to jpeg by typing:
raspistill -o image.jpg
This will enable preview for default 5s and captures an image at the end of the period. Option -o means output ti file specified. Red LED on-camera board indicates when the camera is in preview mode. Let’s say you want to preview to be 2s before image capture. Then use the -t 2000 option. The number represents milliseconds.
raspistill -o image -t 2000
In order to write short video just type following command:
raspivid -o video.h264 -t 2000
this will write 2 second video in to H264 formatted file.
In our setup, we are connected remotely to the camera, and so we cannot view images from the putty console. If you wish to see images instantly, then connect a monitor via HDMI or another interface. Otherwise, we need to download images and view them locally or access files via the network. I think the power of Raspberry Pi lies in accessing and controlling things remotely. There is a nice resource on raspberrypi.org where you can transmit feed from the camera module. As we are using Windows for accessing things, we need a couple of programs to download:
Mplayer and Netcat
They both will help to connect to feed. I copied both programs to C drive in to mplayer and nc folders.
First of all, find out your PC IP address by typing ipconfig command in the command prompt. For instance, My PC has a 192.168.1.106 IP address.
First of all lets run mplayer to view feed: in command prompt run following command:
C:\nc\nc.exe -L -p 5001 | c:\mplayer\mplayer.exe -fps 31 -cache 1024 –
Then in raspberry pi console run command to transmit feed to my PC:
raspivid -t 999999 -o – -w 720 -h 360 | nc -v 192.168.1.106 5001
This works like a charm. You can see live video but with some delay.
I haven’t dug deep enough into all features and capabilities of the camera module. The commands raspistill and raspivid support much more options like time-lapse capture, various effects like negative, emboss image capture. The list goes on and on, and it is still a work in progress. If you want to see the full list of features, take a look at camera documentation.
Sadly, but camera board doesn’t record sound when capturing video. If you need audio, you need to find a different solution for this.


Well, I just found your blog through search engine.I didn’t intend to visit it before, yet after I read your article, I just can say that it’s so inspiring. Thanks for making such nice article!