
Simple steps on how to build your own website fast and easy!
Are you still considering to build your own website, but something is holding you back? Maybe you think it is too tricky, technical and require some special skills like programming and design. I can assure you that these days are long gone.
Building a website is as easy as dragging a few things on screen and writing a text. Having a professional-looking website will take less than an hour, regardless of your prior experience and knowledge.
Follow this step-by-step tutorial on how to build your first website, and you will have it running without any stress. Believe me, most of the website developers are doing the same things, and you will get the same results as a pro.
- The purpose of creating your own website
- Start with free website building software
- Select a web hosting plan for your own website
- Start with the Basic hosting plan and expand later when you grow
- Get a free domain name and SSL with hosting plan
- Create your hosting account
- Hosting package information and extras
- Hosting payment options
- Finish registration and get login information
- Create your own website
- Install WordPress website automatically
- Set up website title and tagline
- Start with free WordPress theme
- Use WordPress admin login to set it up completely
- Disable comments at least for now
- Set up permalinks
- How to install plugins to your WordPress website
- Best plugins for WordPress so far
- How to publish content to your website
- Create necessary pages for your website
- Create your website menu
- Create content categories
- Explore other settings and tweaks
- Writing your first content
- What to do next with your website?
The purpose of creating your own website
If you are here, you probably already have a goal of building a website. However, there are a few initial thoughts on why you would need one or more.
The business website. There is no excuse for not having a working website for your business. I still see many small and more significant enterprises not having sites representing their brands, information about services, and products. Others simply rely on social networks that may be OK for now, but you do not have full control of your content and brand in the long run. Social networks should complement but not substitute your business profile.
Your personal website. There may be many reasons why you would want to have a personal website. Maybe you have a passion or hobby. The website is a great place to share, discuss, and get feedback. Probably you already have Facebook, Instagram, Twitter, or YouTube accounts where all this happens, but you never know how they will look in the future and how much control you have over your content. Your website should be the connecting dot of all social networks you may have.
Online business website. This another big reason to start building a website. There are many ways to make money online, whether partially or even full time. All you need to do is to begin writing great content you are confident and monetize it. Sharing great information will always be valuable. There are many ways to earn money online. Here are a few most common:
- Selling your own physical or digital products
- Reselling (or drop-shipping)
- Affiliate marketing
- Online courses
- Online services
- Advertisement
You can probably think of even more purposes for websites. Each of them is great. So let’s move on to more practical things.
Start with free website building software
You may get lost between available website tools and software. The good news is that most of them are free and open. Unless your needs are unique, you should choose free website building tools and platforms for many reasons. The most important is a large community. This means that they are actively maintained, and you will always find help when needed.
The clear winner among website platforms is WordPress.
The other influential free dynamic website builders are Drupal, Joomla.
Almost nobody builds websites using HTML and CSS because it takes lots of time. Also, it is tedious to maintain them as you need to go through the code and make the necessary changes.
If you want to build a simple and rarely updated website, you can use a static or semi-dynamic website builder. For instance, Wix is one of the leading website builders.
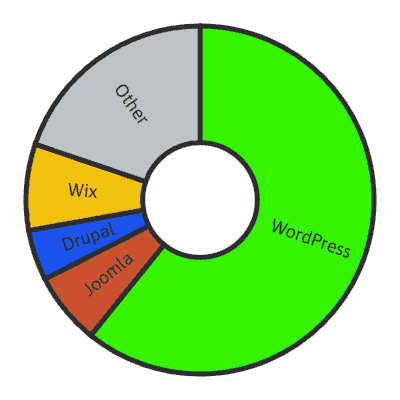
According to the recent W3tech.com statistics, WordPress is the leader taking a whopping 60.8% of all websites using a dynamic content management system. WordPress takes 34% of overall websites.
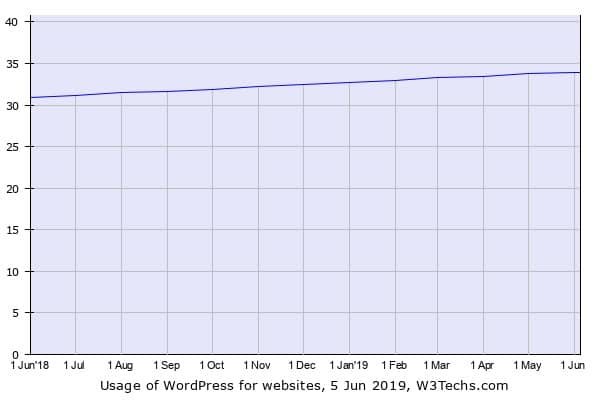
The trend of WordPress usage for websites is continually going up, and it seems to be like this for a while.
Why is WordPress so popular amongst website builders?
First of all, it is entirely FREE. From the very beginning, WordPress was developed to be a secure, simple, and lightweight platform. Earlier, it was more a blogging platform; now, it evolved into a fully-featured content management system with lots of customizations and features. It can be used for small personal websites and large organizations and communities.
The initial setup is very robust and takes only a few minutes to get it running. No specialized knowledge is required – you won’t even see any HTML or CSS code.
What about other content management platforms like Joomla or Drupal? These are useful and flexible systems that were initially designed for larger websites. The learning curve for them is a bit higher. This is the main reason why they are left behind in WordPress. Joomla or Drupal may be an excellent choice for large community websites or have built-in document management. They are less user-friendly and involve more technical stuff while setting up.
I have been using Drupal and Joomla for managing a few sites, but eventually migrated to WordPress for many reasons. WordPress is more optimized for content sites that are more secure, lightweight, and fast.
Unless you are already familiar with website building, I strongly recommend sticking with WordPress.
Select a web hosting plan for your own website
When you have a website idea and platform (preferably WordPress), you can set up an actual website. To have your website up and running, you will need two essential things:
A Domain Name – the exact name of your site such as https://mywebcopy.com
A Web Hosting – a physical place where your information will be stored – like bluehost.com
They are both essential assets. A domain name is your actual brand, how you will be recognized and access via on Internet. Domain your own legal property meaning that you have all rights to use it as you want – point to a website, use it for email, and even sell to another person or organization at your price.
The hosting is a remote physical computer server, where WordPress software is running, where you upload articles, images, and files to be accessed through the webpage.
Start with the Basic hosting plan and expand later when you grow
Most of my websites and domains are hosted in the Bluehost (Get Bluehost here!) web hosting provider. Start registering through the previous link to get the best price and free Domain name and SSL for the first year.
- Automatic WordPress install and updates
- Free Domain Name for the first year
- Free SSL Certificate
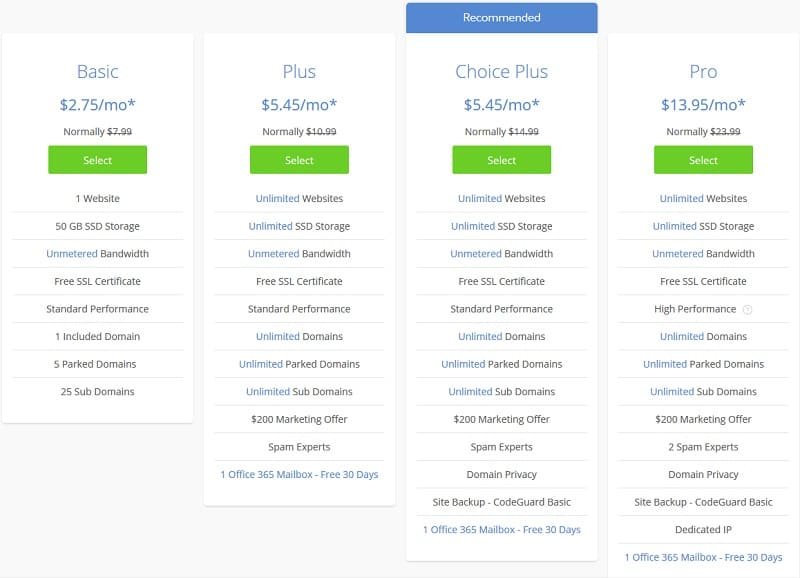
For your first website, you can start with the Basic plan, which is $2.75 per month. If you are planning to run more than one website, then select at least the Plus plan. No problem, you can upgrade your plan any time later.
Bluehost is one of the leading hosting companies with servers based in the US. Servers are optimized to handle heavy traffic, and being a huge company can offer excellent price plans.
Get a free domain name and SSL with hosting plan
You are free to select a different domain name registering company. In Bluehost, you can choose an external domain and use only a hosting service. I think it is worth ordering the full package because you get a free domain for one year and free SSL.
The website works just fine without SSL Certificate. Then your website address will be like http://mywebcopy.com. When SSL is applied to your domain name, the address looks like https://mywebcopy.com. The real difference is that your HTTP request is encrypted and more secure. HTTPS uses the SSL/TLS protocol to encrypt communications so that attackers can not steal data.
Modern browsers are starting to penalize websites without SSL. In the address bar, you usually get a warning message that the website is not secure. This naturally makes visitors feel unsafe.
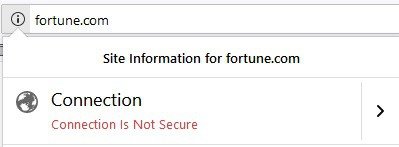
Users when visiting a website are intuitively expecting to see a padlock on the address bar.

There are also signs that major search engines, such as Google, are ranking secured sites higher.
Right now the SSL is still an optional choice, but I believe, that shortly it will be standard practice to enable it by default without the significant need for user action.
How to choose a domain name
Once you have a website in mind, and probably you have already thought of a domain name. There is a big chance that your desired domain name is taken. What to do next? One way is to keep trying different names until you find an unoccupied one. And it looks somewhat odd. How not to get stuck in a domain name brainstorming loop?
Here is a whole post on selecting a domain name. Anyway, here are a few quick tips to keep you on track.
- Try to keep it short – between 10 and 12 characters appear to be optimal
- Try to reflect what the website is related to. You can use combinations of keywords
- Make it memorable and easy to pronounce
- Avoid numbers and hyphens – it is hard to pronounce.
- Stick to the .com extension to be in the safe. .net and .org are also OK in most cases. For local websites, you can go with country-related extensions like .de, co.uk, .ru
- Feel comfortable with your new domain name. Imagine how it will look in a few years when your site will grow
Create your hosting account
It is time to take some action. At this point, you should have the desired domain name written in front of you—time to select a hosting plan and start building a website. Go to BlueHost homepage and click Get Started button. Then select hosting plan from Basic, Plus, Choice Plus, and Pro. If you are a beginner, start with the Basic hosting plan and scale later as you grow.
Click the green Select button near the preferred hosting plan then you are directed to the domain name prompt. You can create a new domain that we selected or enter the existing domain you purchased previously. Enter your new domain name, for instance, mywebcopy and pick .com (or other) extension:
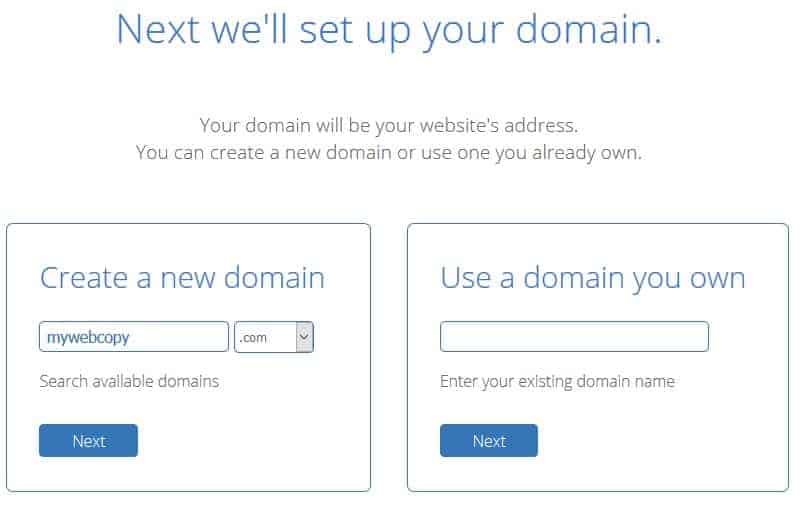
If you have a domain name (can be parked elsewhere), type in the area named “I have a domain name” and click the Next button.
There is also an option to order a hosting plan and decide on the domain name later. They are giving a free domain credit of $11.99 value (not recommended for beginners).
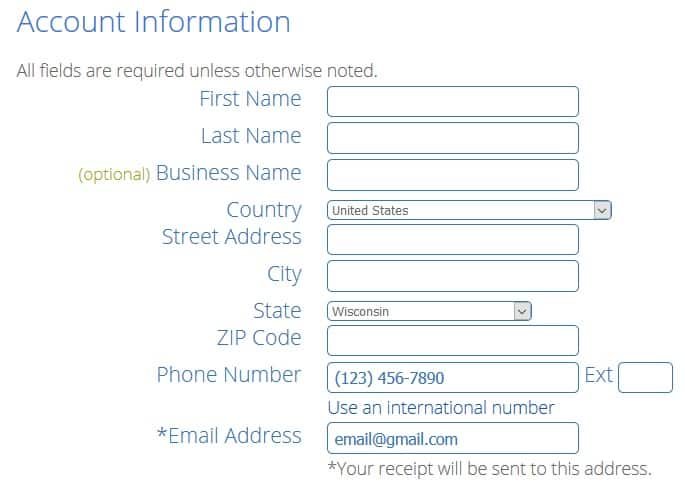
In the next step, you will need to enter your Account Information. Fill in your First Name, Last Name, Country, Street Address, City, State, ZIP, Phone number, and email (this is where receipt and other important account information will be sent).
Hosting package information and extras
Bellow, in the Package Information area, you have to choose the hosting plan’s initial duration. The best discounts are when you select the most extended period.
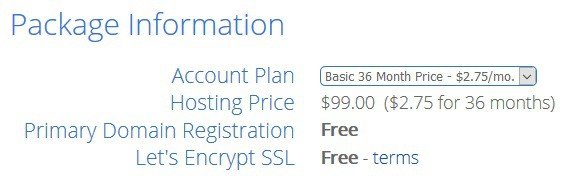
Usually, your website will be live for a long time; there is no brainer that the most optimal choice is 36 months.
You may only need Domain Privacy Protection from the Package Extras, which is only $0.99 per month. It keeps your registration (including email) information hidden from public access. Instead, the web hosting company information will be provided. This prevents potential spam.
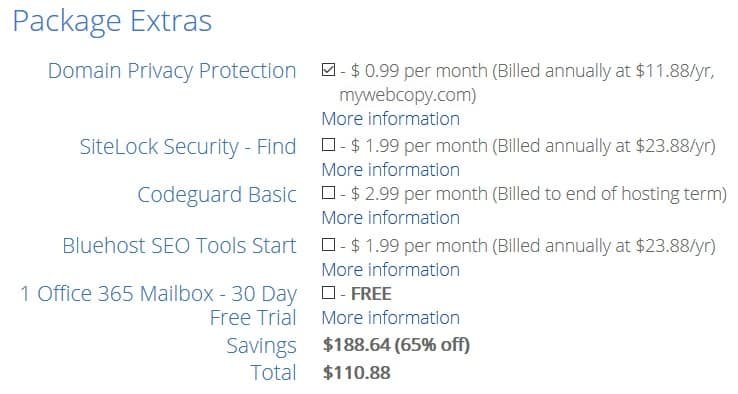
The more advanced hosting plans like Choice Plus have some of the extras already included.
Hosting payment options
Most website hosting companies offer two payment options: Credit Card and PayPal.
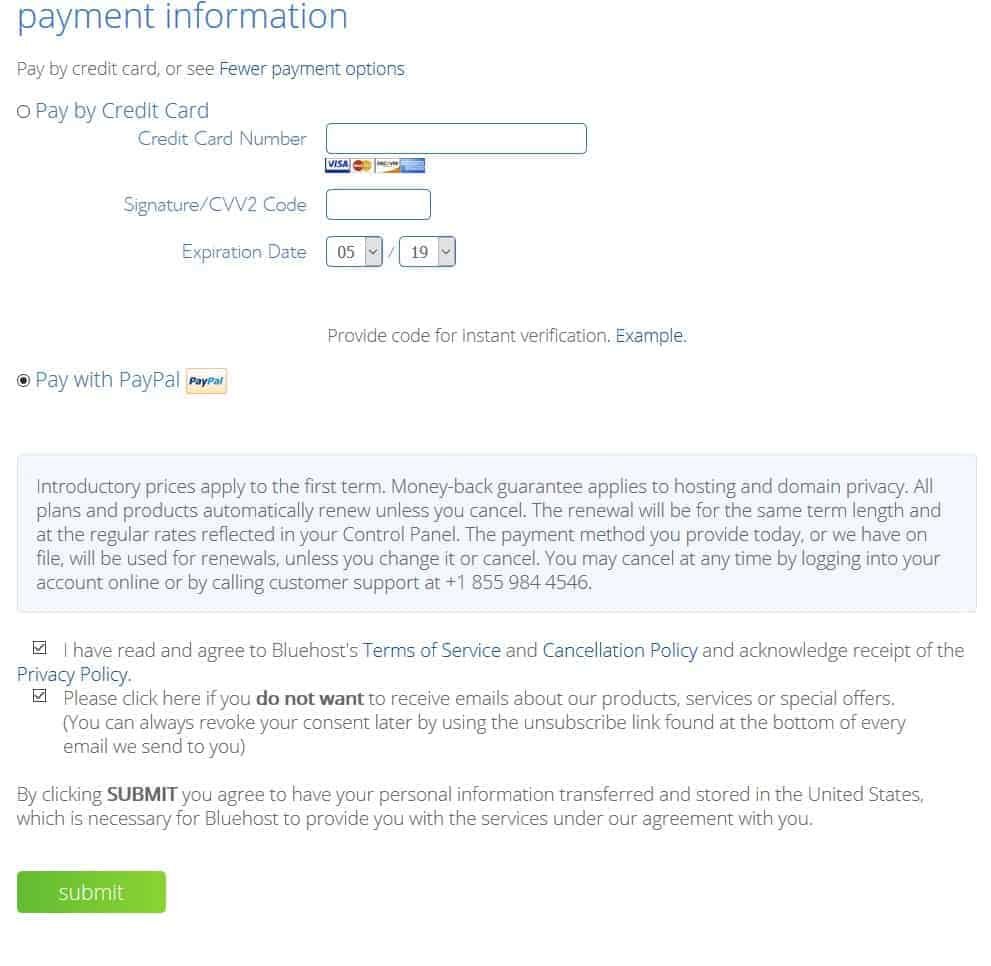
I like using PayPal, but it is up to you which payment option to use.
Before submitting information, select checkboxes to agree to policies and prevent yourself from getting special offers to your email.
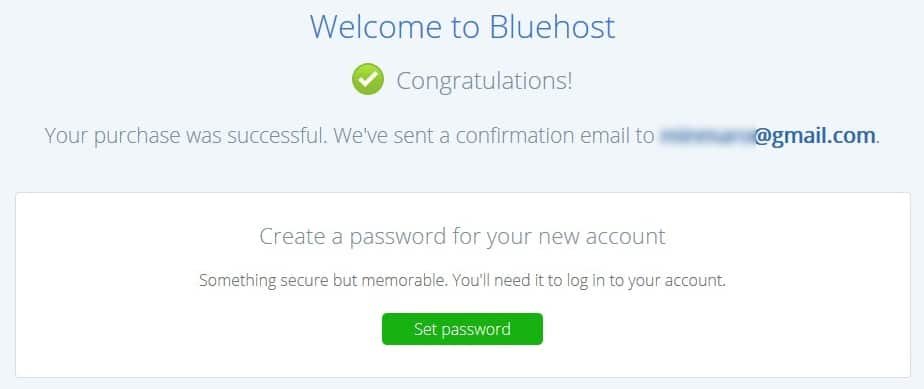
Finish registration and get login information
After your payment is processed, registration is finished. The last thing you need to do is to create a password to login into the Bluehost account.
Create your own website
Now the fun part begins, where you will start building your website. We will go through all the steps to get it working. We will stick with WordPress, but you are free to go with other website building platforms.
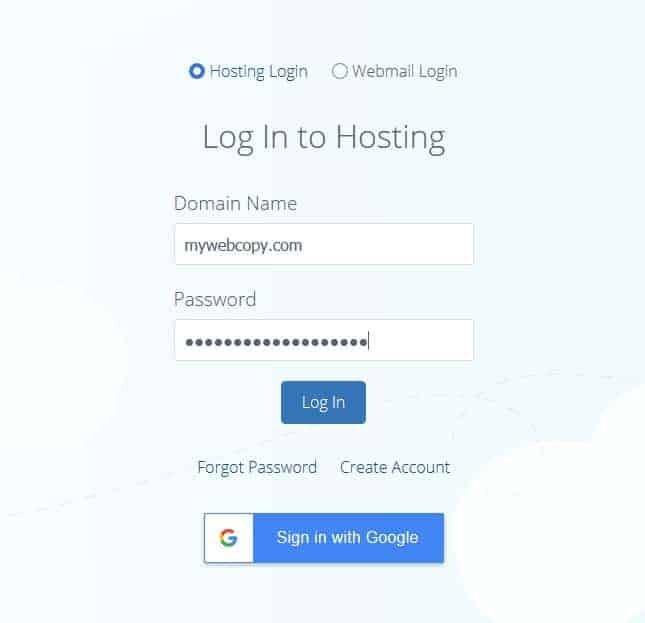
So login to your Bluehost account and go to control panel.
Install WordPress website automatically
If you went with the Basic hosting plan, in the control panel, you would find that Bluehost has already prepared WordPress software for you (if not, click Create Site). They have done a great job integrating lots of functionality in to control panel so that you could manage most of the things conveniently. This only proves that Bluehost is optimized for WordPress.
The wizard will take through necessary steps that help to complete the website setup.
Set up website title and tagline
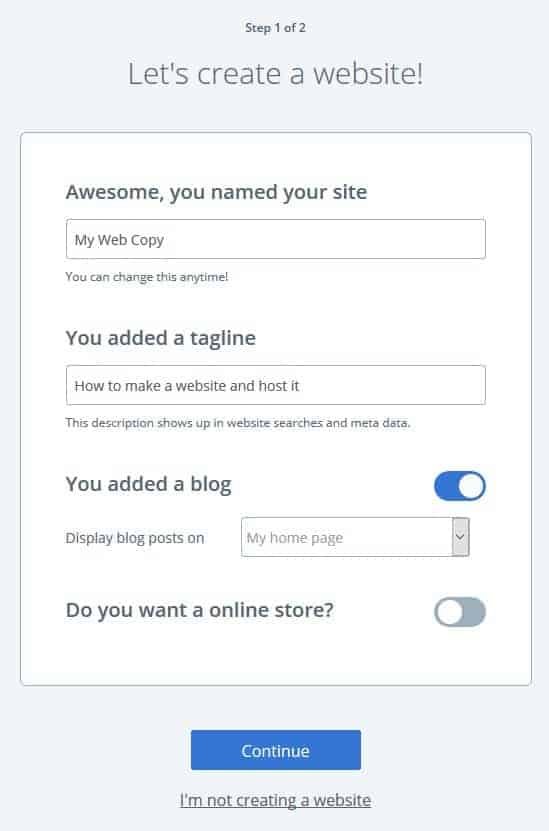
In the first step, you need to enter the name of your website and secondary tagline. These will help to identify your website and briefly tell everyone, including search engines, what your site is about.
Select “You added a blog” if you plan to have a beautiful homepage and keep your blog posts on a separate page. In this case, you will need to select the blog posts page in the drop-down menu. Don’t worry if you haven’t decided yet – all these things can be changed at any time. A similar situation is with the online store option. Do not select it – as it may be included later. Let us keep it simple for now.
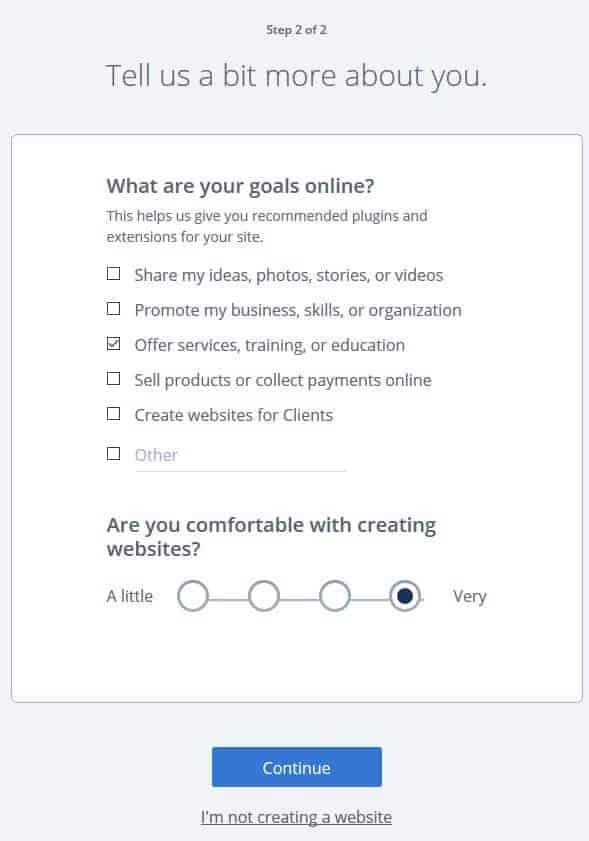
In the next step, the wizard tries to collect even more information about your planned website. This only encourages Bluehost to suggest suitable plugins. For simplicity, do not check any checkboxes or at least one if it will insist. Continue to the next step.
Start with free WordPress theme

This is where we get to the website design. Here you may select a website theme. This is only your preference for how your website will look; the only advice is to keep it simple, clean, and lightweight. There are thousands of free WordPress themes, which might not be very clear which one is best for you. If not sure, choose any from the list or skip this step. You can change the theme later.
Use WordPress admin login to set it up completely
Once your website is set up, you can work further from the Bluehost Home panel. Here you can see a list of recommendations on what to do next.
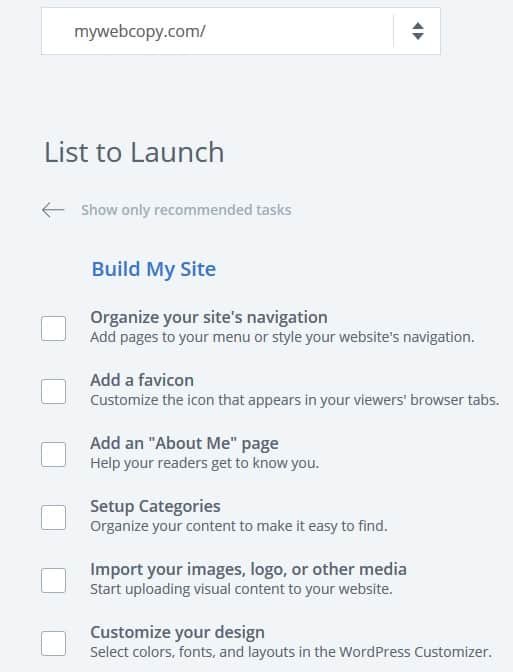
The suggestions are great for implementing necessary website parts like setting up categories, creating an “About Me” page, adding content. However, most of the selected tasks will redirect the WordPress admin panel, where all magic happens.
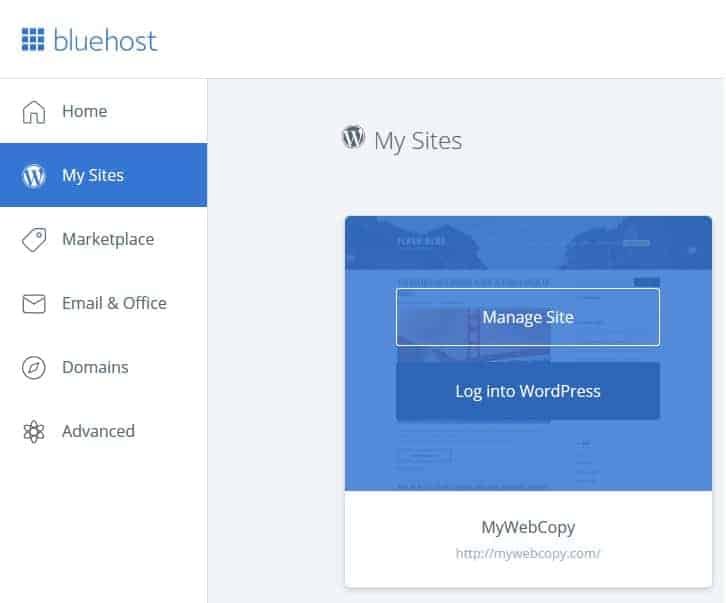
I strongly recommend working from the WordPress dashboard because the wizard may become confusing with the redirects and linked actions. You can access the dashboard from the Bluehost My Sites menu when clicking Log in to WordPress or go directly to the website address https://xxxxxxx.com/wp-admin/ (in my case https://mywebcopy.com/wp-admin/) where xxxxxxx.com is your domain name.
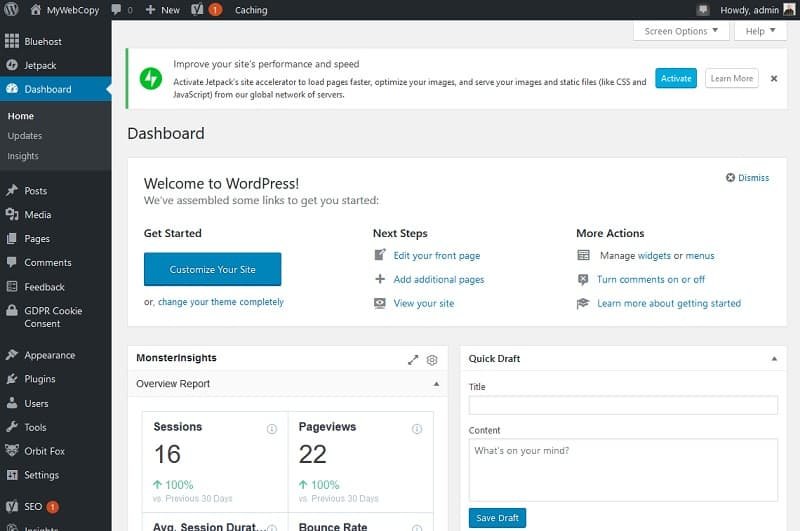
The wordPress dashboard has a sidebar with the menu for settings. The Dashboard Home provides a quick view of what is going on with your website. Ass you will add more plugins, the home screen is filled with stats, tips, and quick links.
Set up your WordPress theme through the Appearance menu. It would be best if you went to Appearance->Themes, where you will see already installed themes, and the first top left is active. You can browse through tons of free themes by clicking WordPress.org Themes or use Premium themes. If you purchase a theme from other sources, you may need to upload it by clicking the Upload button.
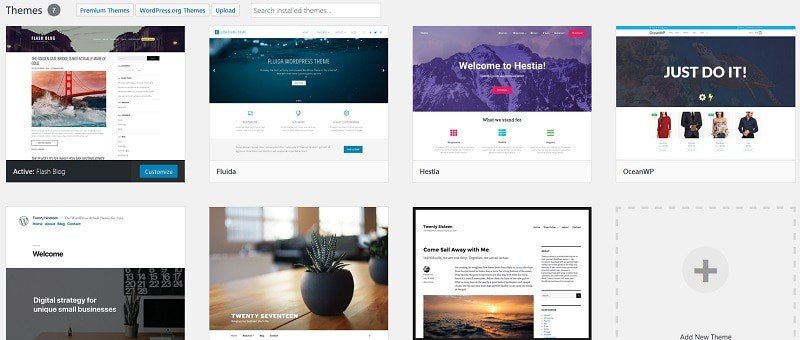
Take your time to search for a theme, which is right for you. Be sure to choose the lightweight, responsive, and one that is actively maintained. If you are serious about your website, down hesitate to go with premium themes, as they usually have more features and are optimized for performance. The other benefit of premium themes is that you get immediate support if you are stuck.
Other than that, do not afraid to test multiple free themes and see how the website looks.
Disable comments at least for now
For a new website, I highly recommend disabling comments on all posts. In the Dashboard, go to Settings->Discussion and uncheck “Allow people to post comments on new articles.” You may enable comments once you set up proper spam protection. Also, you may allow or disable comments for individual posts.
Set up permalinks
The permalinks are the actual link structure to your posts. By default, WordPress may be using links like
- https://mywebcopy.com/?p=123
It is recommended to use post names in the link structure. In Settings->Permalink select Post Name in Common Settings.
- https://mywebcopy.com/sample-post/
Bluehost wizard could already set this up.
How to install plugins to your WordPress website
The real power of WordPress is in the plugins. The out-of-the-box installation is excellent, but plugins can make a website much more flexible and attractive.
The plugins bring additional functionality to your website. They are building blocks that add different features to your website without writing a single line of code.
There are thousands of plugins available. It is easy to get excited, but consider using any plugins only if you really need them. Don fall for fancy things that do not bring any value to your website and, most importantly, for your visitors. Keep in mind that each additional plugin may slow your website and bring errors.
Use only popular plugins that are necessary for a website.
Best plugins for WordPress so far
The usage of plugins may depend on your specific needs, but few can be found on almost all websites.
- JetPack: This is a powerful plugin, which brings a beautiful set of functionality. It takes care of website security, speeds up performance, optimizes images, and tracks activity. On the Dashboard, it places useful stats of visitor activity. It may be used as a free tool or premium. I find free tools enough for most websites.
- Akismet: it already comes preinstalled on the WordPress site. All you need is to get an API key. If you already have a JetPack plugin, it can be done automatically. Akismet is a front line defense from spam attacks. It effectively filters comments from spammy content and suspicious URLs.
- Contact Form 7: The contact form allows visitors to contact you via email. Usually, the contact form is placed on the About Me page, where user can submit their questions. Jetpack also has an integrated contact form with works the same way, so contact form 7 maybe already unnecessary.
- Yoast SEO for WordPress: WordPress is already an SEO friendly, but it pushes even more useful functions. It allows editing meta-descriptions of posts, analyzes post integrity and user-friendliness. If you are looking to rank your pages high in search engines, this is a necessary plugin. The free version already works great.
- Classic Editor: Not a long ago, WordPress have changed its Classic Editor to Gutenberg. Gutenberg is a modern way of editing content through blocks and fields. This gives much more flexibility on how your post looks like, but you may prefer a casual text editor experience. In this case, you may install the Classic Editor. I highly recommend using Gutenberg editor, as it allows the creation of beautifully formatted posts.
You can find more great plugins that require a separate post for a more in-depth view.
How to publish content to your website
You can tweak your website design and functionality endlessly. The process is similar to house decoration; you will be making small touches when you feel that it needs something tweaking. A website is a dynamic thing that grows and evolves.
The real value of the website is in its content. Be sure to pay the most attention to this part. It is the content for why people are visiting your site. There are plenty of websites where design and functionality do not shine, but people love them for the value they provide. If you do not feel secure at designing, focus on writing excellent posts. Before you dive into writing content, be sure to take care of standard pages such as Contact Us, About Us, Terms, and Conditions.
Create necessary pages for your website
Contact Us, About Us, and Terms and Conditions pages can be standard at the beginning. Contact page usually is built using the Contact Form 7 plugin or the one that comes with Jetpack. This is the most straightforward page you will ever create.
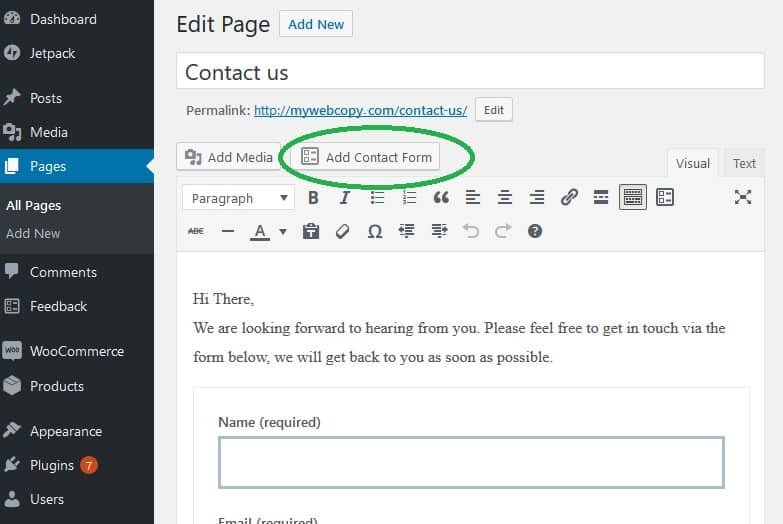
To create your first page, go to Dashboard->Pages and click Add New.
With Gutenberg editor, you will need to build it with blocks as tiles. Initially, you will need to Add a Title.
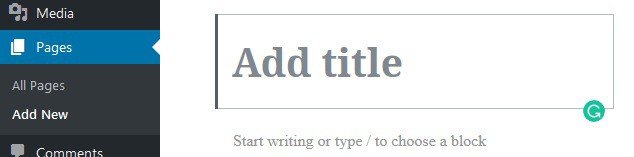
Bellow, there is a place for the next block, marked as “Start writing or type / to choose block.” You can start writing right away or click the + icon to add any block from the list.
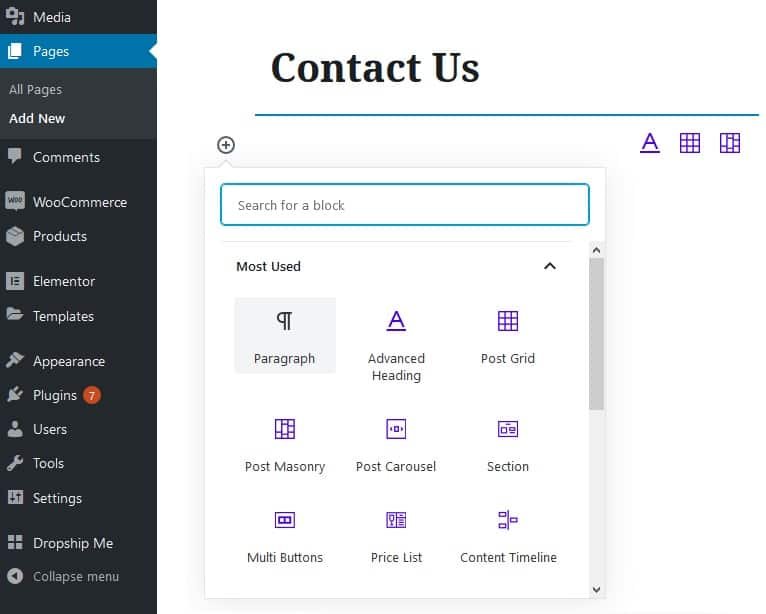
Add another block by pressing the + icon, and from the Jetpack group, select Form. Enter your email where user emails will be directed, and the subject line lets you know where those emails are coming from:
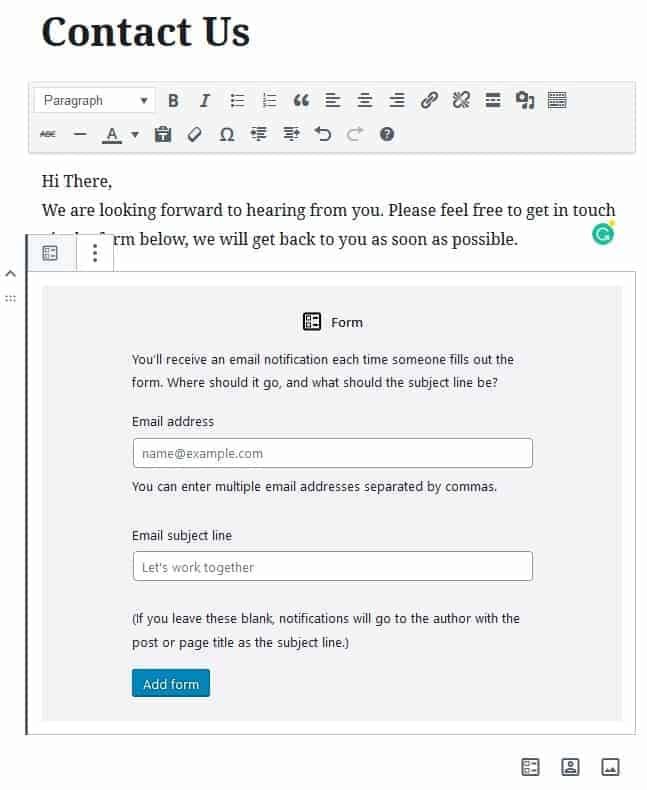
This is all you need to do. Click Publish button to make it live.
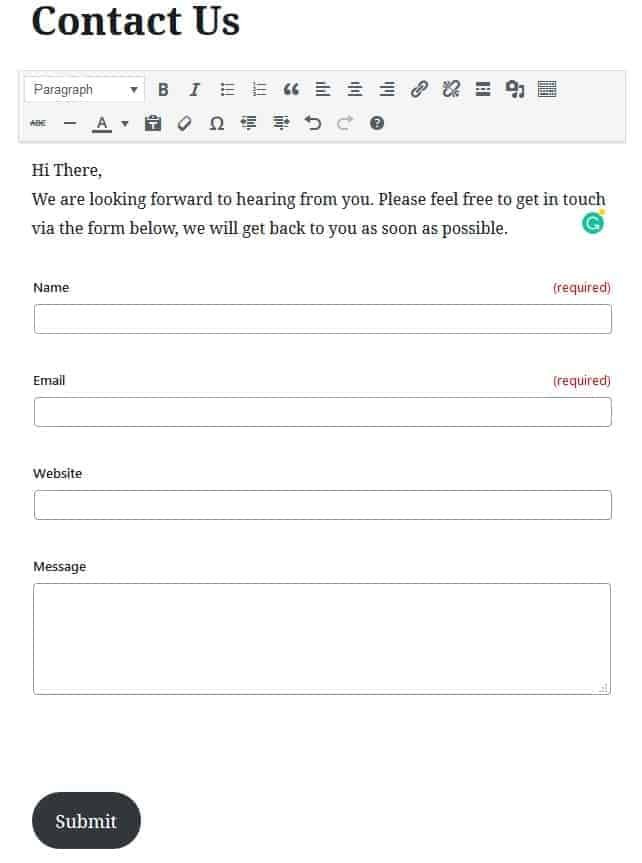
The page is live, and you can access it through the link https://mywebcopy.com/contact-us/. Be sure to use your own domain.
Similarly, you will create other pages. If you like the more traditional way of editing your posts and pages, be sure to install the Classic Editor plugin, which enables a standard Word-like editor like so:
Create your website menu
The website menu allows users to navigate through the content. Menu items may be placed in different places on your site. It is up to you and the selected Theme, where menu items will be placed. The menu items can be linked-to pages like Contact Us, external links, posts, categories.
To create a menu block, go to Dashboard->Appearance->Menus. Usually, there is a Primary menu automatically created – all you need is to add menu items from the “Add menu Items” list
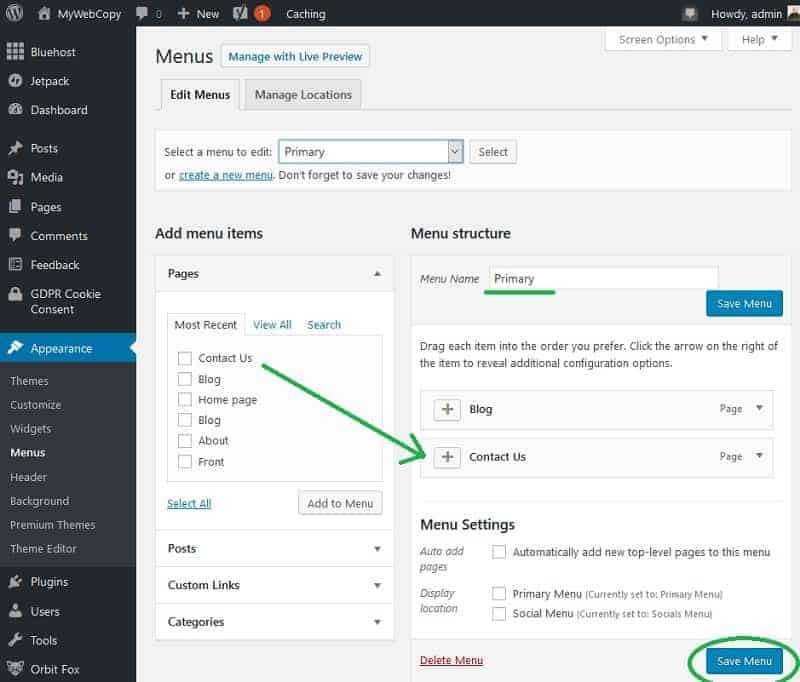
Later you may create as many menus as you need and place them in different website locations.
Create content categories
Before writing your posts, it is a good practice to assign them to Categories. They are a great way to keep content organized. Later it will become easier to split posts into different category pages, create category navigation menus, filter content, and do more stuff as you progress.
To start adding categories, in Dashboard go to Posts->Categories
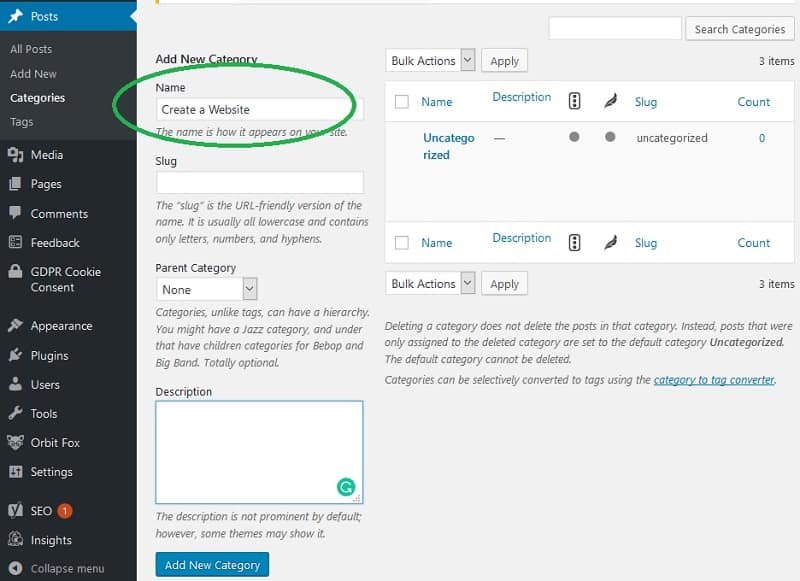
Enter the category Name and Description of your new group. There is also an option to create nested categories (subcategories), but I recommend keeping things simple and using only one level categories.
Explore other settings and tweaks
It is impossible to cover all possible configurations and tweaks you can do in WordPress. The Dashboard is very intuitive to use. Do not afraid to explore. Try things while your website is empty. Do not get caught in appearance polishing too soon. It takes time to get used to the new look of the website.
Once standard settings are working properly, start writing the content. The website with posts will begin to look different and much better than an empty template.
Writing your first content
There are many guides on how to write great web posts, be sure to check them out before you start.
Writing posts in WordPress is very similar to creating pages. To create a new post in Dashboard, navigate to Posts->Add New.

Write your text, add images, select a category, and click Publish to see your first post live on your website.
What to do next with your website?
There are endless possibilities with WordPress. Once you get comfortable with what you learned, start exploring even more. There are tons of tutorials on making your website great, well optimized, and standing out.
If you are stuck while building a website, or setting hosting, you can drop a note via Contact Form – I will be glad to help.