After the project source code is developed, there is always a need to flash it to the microcontroller. There are a few ways to program AVR microcontrollers. Usually, we used to flash AVR’s with an ISP adapter (or another programmer) that is not always handy, especially when designing a device for the end-user who doesn’t have an ISP adapter or doesn’t know much about flashing MCU. So it is better to flash a bootloader program AVR MCU once with a programming adapter and later load firmware interactively when starting AVR.
The bootloader allows updating the firmware without a programmer and enables different programs for different purposes depending on the situation flexibly. But enough about this.
So my purpose today is to test AVR universal bootloader, which Shaoziyang is developing. He aimed to create a universal bootloader that works on different AVR microcontrollers with minimal code modifications. Bootloaders you can find on the Internet are mostly available for particular microcontrollers, and nobody wants to do a lot of modifications to adapt to different MCU when needed.
This AVR universal bootloader can support most AVR microcontrollers (Mega series), which have the self-programmable capability, boot section, and UART. If the device has many serial ports, you can use any one of them. Bootloader supports RS232, RS485, and RS422. It can also support USI, SPI, I2C interface if you made some modify. This bootloader occupies less than 1k words flash maximum, and it may occupy less than 300 words minimum. The space occupied by the bootloader is relative to devise type, configuration parameters, functions you select, and the optimized grade that the compiler use.
Main features of bootloader are:
- Support many types of AVR microcontrollers;
- Support AVR device with multiple uarts;
- Support RS232/RS485/RS422 mode;
- Support customize communication baud rate and system clock frequency;
- Automatically calculate the baud rate error;
- Write with AVR GCC, 100% C code;
- High optimized code, occupy small space;
- Cut out the function conveniently, and can meet different requirements;
- Support Watchdog;
- User may use the LED to show the upgrade status;
- Support to use the super terminal as download software on PC;
- Support verification while writing to FLASH;
- Can define the size of user program section;
I have an Atmega128 board on my desk, and I will try bootloader on it; first of all, we need to download bootloader files from the authors’ site. You only need bootloader source files (download latest 3.1 version) and win32 application to communicate with the target (download latest 3.1 version). Once files are downloaded, extract them to any location and leave them.

Now create a new project in AVRStudio and copy the following bootloader files (bootldr.c; bootldr.h; bootcfg.h) to the project directory and add them to the project tree. Now it’s time to modify project parameters that are in bootcfg.h file so they would fit Atmega128 settings. There are quite a few parameters you may change, but most of them are OK. Let’s see what I did.
- Changed MCU clock frequency
<#define F_CPU 7372800UL>;
- Changed Bootstart section address according to the datasheet
<#define BootStart 0xFC00>;
- Atmega128 has two USART ports, selected USART0
<#define COMPORTNo 0>;
- Turned off watchdog
<#define WDGEn 0>, of course, you can leave it, but you have to preserve it in your main application, so MCU won’t keep resetting;
- As my board has LED so defined where it is connected so I could see boot loading process
//enable LED indication
#define LEDEn 1
//LED control port
#define LEDPORT B
#define LEDPORTNo PB6
- Saved file – all modifications are done;
And there is the last thing – we have to configure makefile to show what type of MCU is used, what frequency, and where the flash section starts. For this, press the Edit Current Configuration Options†button in AVRStudio. First of all, update General configs:

Then go to Memory Settings and create a memory segment where the bootloader starts. In my case it is 0xFC00:
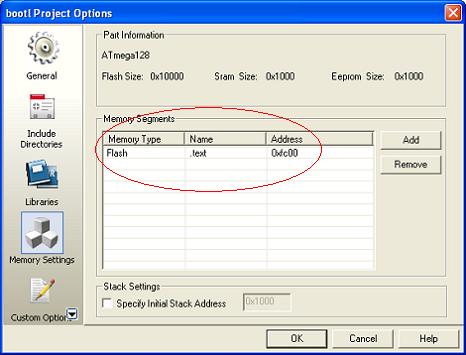
Then I built the project which took 1366 bytes (1.0% Full).
Flashed bootloader to Atmega128 via ISP and Ponyprog and then configured fuses for correct Boot section size and enabled Boot Reset Vector:
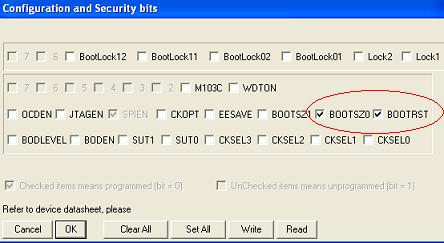
Checking BOOTRST means that the bootloader after it finishes loading the program resets to 0x0000 address where the loaded program starts.
Now it’s time to connect the target board to the PC COM port and upload the test program for this open avrubd.exe application. And configure options so it could communicate correctly. For this, go to Options->AVR and select:
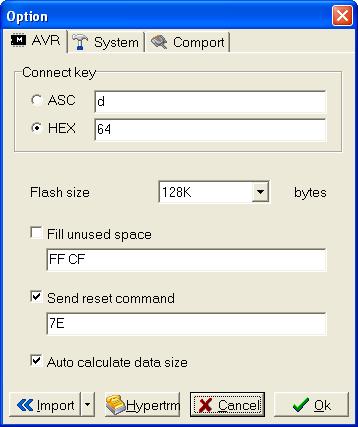
Options->System:
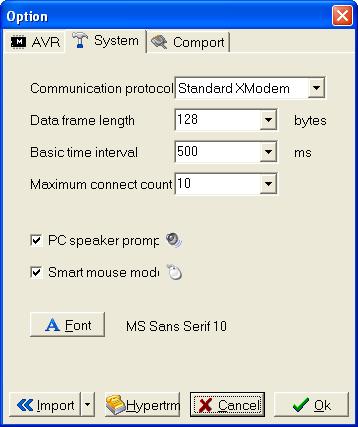
Options->Comport:

After options are set, open the hex or bin file to be downloaded and press the black Dn button. It will start sending connect key, which means you have to reset the target boar to enter the bootloader. If you wait too long – the connection will fail. This is how successful firmware update messages looks like:
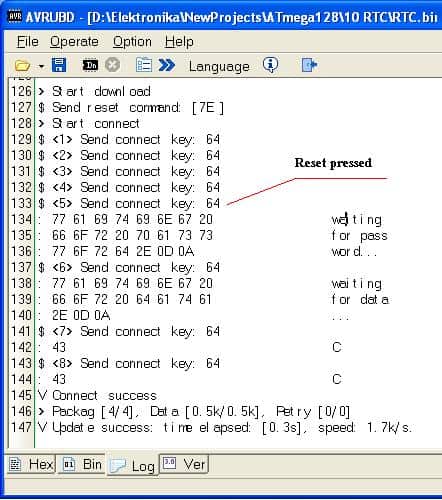
The documentation text author says that the bootloader has been tested with the following AVR microcontrollers: ATmega8; ATmeag64; ATmega128; ATmega168; ATmega169(Bufferfly); ATmega16; ATmega32; ATmega162. So it is an excellent open-source bootloader project everyone can use easily.


A good tips, is to use your program (not the bootloader) to reset the device. This avoid the need to a push the reset button. You can do this easily with something like this (for a ATMega8)
void (*resetptr)( void ) = 0xE00; // Set up reset to bootloader
SIGNAL (SIG_UART_RECV) {
…..
if (c == ‘r’) { uart_puts(“Reset \r\n” ); resetptr(); }
…
}
By this way, you can simply press r to reset, and flash. Even better, you can patch the program on the PC to do a automatic reset this way.
Hum, I’m wondering if this bootloader can work with AVRdude ? (avrdude -p m8 -c avr910)
Bye bye
Hi,
Should not the BootStart address be 1F800 since the configuration file mentions that it is a byte address?
you said end of text “After options are set, open hex or bin file to be downloaded and press black Dn button…”
I don’t understand which hex file open, “Bootldr.hex” or “test.hex”.
when I open Bootldr.hex via avrubd.exe, update is success but test.hex is not.
Bug hint:
1-Byte checksum mode is buggy. Receive function expects 2 bytes regardless of checksum mode. Can be fixed easily.
Thank you for the wonderful explanation. I tried using this Bootloader in my ATMega32. I am using 11.0592MHz External crystal. Also I am using 2K BootSector so my BootSector start address is 0x3800 Hence I have set the Fuses as CKOPT, BOOTSZ1, BOOTSZ0 and BOOTRST programmed. Rest all other fuses unprogrammed.
I have downloaded the bootloader using ponyprog. Later I downloaded my Application HEX using AVRUBD and it is successful and after giving RESET the Application is running. But if I give a PowerOFF and then ON, the application is not running. When I examined the Flash content I found that after PowerOFF and ON the first sector of Flash (0x0000 till 0x007F) has been overwritten to 0xFF. In summary the application is loaded successfully the first time without PowerON Reset, and it fails after a power cycle. Could you please let me know if I am making any mistake, also please suggest me some idea to solve this issue.
Thank you
Torrmor