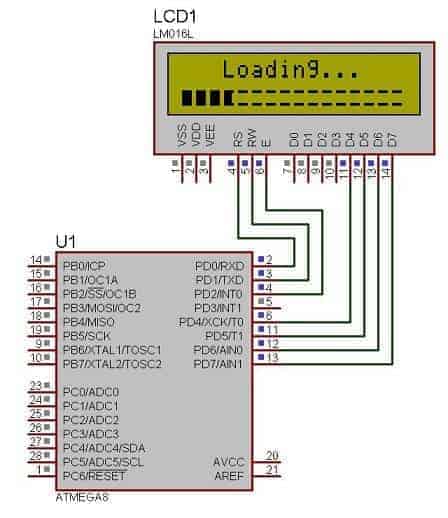
Earlier I have used 4-bit and 8-bit LCD libraries in various projects. It was hard to maintain and update. Now they are merged into one library where the simple logic structure is implemented to select a 4-bit or 8-bit LCD library just by modifying only three code lines.
In the library header file there is line added:
//Uncomment this is LCD 4 bit interface isused
//******************************************
#define LCD_4bit
//******************************************
You can select different LCD modes by commenting and uncommenting this line. Also, don’t forget to select proper ports and pins where the LCD is connected:
 #define LCD_RS         0          //define MCU pin connected to LCD RS
 #define LCD_RW        1          //define MCU pin connected to LCD R/W
 #define LCD_E           2          //define MCU pin connected to LCD E
 #define LCD_D0         0          //define MCU pin connected to LCD D0
 #define LCD_D1         1          //define MCU pin connected to LCD D1
 #define LCD_D2         2          //define MCU pin connected to LCD D1
 #define LCD_D3         3          //define MCU pin connected to LCD D2
 #define LCD_D4         4          //define MCU pin connected to LCD D3
 #define LCD_D5         5          //define MCU pin connected to LCD D4
 #define LCD_D6         6          //define MCU pin connected to LCD D5
 #define LCD_D7         7          //define MCU pin connected to LCD D6
 #define LDP PORTD  //define MCU port connected to LCD data pins
 #define LCP PORTD  //define MCU port connected to LCD control pins
 #define LDDR DDRD //define MCU direction register for port connected to LCD data pins
 #define LCDR DDRD //define MCU direction register for port connected to LCD control pins
In AVR LCD library there also is a couple new functionalities added:
- Predefining 8 custom LCD characters during LCD initialization;
- LCDprogressBar() function, which has been adapted from AVRLib.
Complete set of AVR LCD functions:
 void LCDsendChar(uint8_t);              //forms data ready to send to 74HC164
 void LCDsendCommand(uint8_t);      //forms data ready to send to 74HC164
 void LCDinit(void);                             //Initializes LCD
 void LCDclr(void);                                          //Clears LCD
 void LCDhome(void);                         //LCD cursor home
 void LCDstring(uint8_t*, uint8_t);      //Outputs string to LCD
 void LCDGotoXY(uint8_t, uint8_t);    //Cursor to X Y position
 void CopyStringtoLCD(const uint8_t*, uint8_t, uint8_t);//copies flash string to LCD at x,y
 void LCDdefinechar(const uint8_t *,uint8_t);//write char to LCD CGRAM
 void LCDshiftRight(uint8_t);   //shift by n characters Right
 void LCDshiftLeft(uint8_t);     //shift by n characters Left
 void LCDcursorOn(void);                   //Underline cursor ON
 void LCDcursorOnBlink(void);          //Underline blinking cursor ON
 void LCDcursorOFF(void);                //Cursor OFF
 void LCDblank(void);                         //LCD blank but not cleared
 void LCDvisible(void);                                    //LCD visible
 void LCDcursorLeft(uint8_t); //Shift cursor left by n
 void LCDcursorRight(uint8_t);           //shif cursor right by n
 // displays a horizontal progress bar at the current cursor location
 void LCDprogressBar(uint8_t progress, uint8_t maxprogress, uint8_t length);
I have added simple demo program which should help to start working with AVR and LCD:


