
Chrome OS, a Gentoo Linux-based operating system, is very stable. To be specific, it would not distract you even though it receives updates from Google. Different from other systems, Chrome OS doesn’t urge you to update.
However, it doesn’t mean that the Chrome OS is always free of issues. For instance, you may receive errors like Chrome OS is missing or damaged. Given that fact, you’re recommended to prepare the Chrome OS recovery image file if any accidents occur. As Chrome has a built-in feature – Chromebook Recovery Utility, things become easier.
You can create a recovery media for your Chromebook by downloading the Recovery Utility to a USB flash drive. What should you prepare for that? What do you need to pay attention to during the process? How to make it? Read the section below with these questions.
Chromebook Recovery Utility Download
As the Chromebook Recovery Utility download process is a little complicated, I divided the whole process into 3 parts. Please read them carefully.
Part 1: Items Required for Chromebook Recovery Utility Download
If you want recovery media to repair your broken Chromebook, you need to find another Chromebook or a Windows or Mac device with Chrome installed. Then carry out the Chromebook Recovery Utility download operation on it.
Tip: If you download the Chromebook Recovery Utility just for precaution, execute the operation on the device you are running now.
In addition to that, you are also required to get a USB flash drive with 4GB available space at least. If your Chromebook has an SD card slot, you can get an SD card to hold the Chromebook Recovery Utility.
You are required to format the USB drive or the SD card before putting it into use. Therefore, you should ensure that there’s no important data on the drive or that the data has a backup. As a professional SD card formatter, MiniTool Partition Wizard enables you to format the SD card or USB drive with ease.
Download and install MiniTool Partition Wizard to your device, and then format your storage device with the following steps.
Step 1: Connect your USB flash drive or SD card to your computer.
Step 2: Launch MiniTool Partition Wizard to go to its main interface.
Step 3: Right-click on your drive from the disk map and click the Format option.
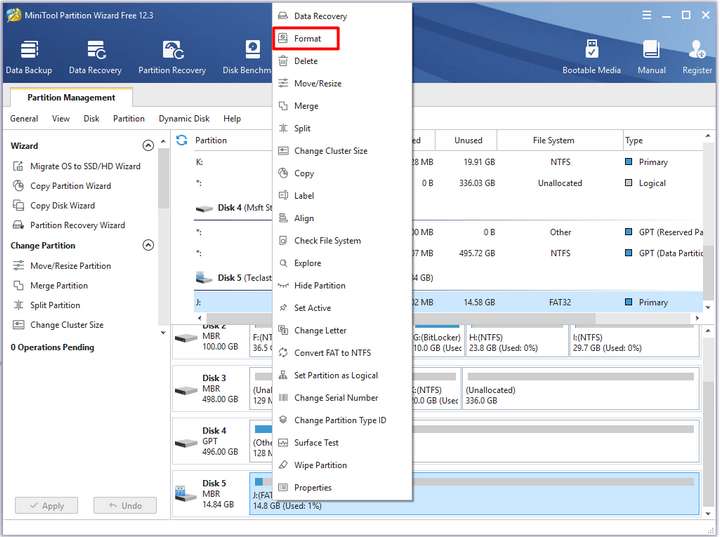
Step 4: In the pop-up menu, configure the partition label, file system, and cluster size according to your demand. Then, click OK to save the changes.
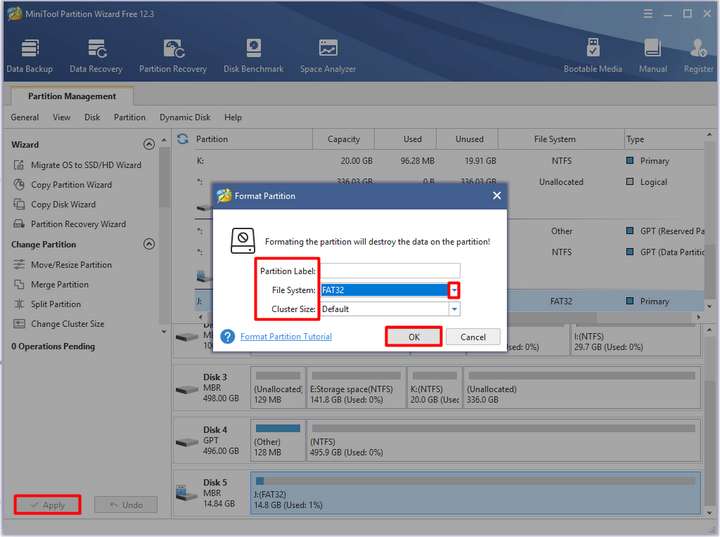
Step 5: Finally, click Apply to execute the pending operation.
Part 2: Learn the Specs of the Chromebook to Recover
It would help if you also learned the specs of the Chromebook to recover before starting the Chromebook Recovery Utility download process. For instance, you should learn your broken Chromebook’s brand and model number.
It is because you are required to choose the information while downloading the Chrome OS recovery image file. The file may vary according to different Chromebook brands and models.
Part 3: Start the Download Process
Now, you can download the Chromebook Recovery Utility by following the steps below.
Step 1: Connect the USB drive or SD card to your computer.
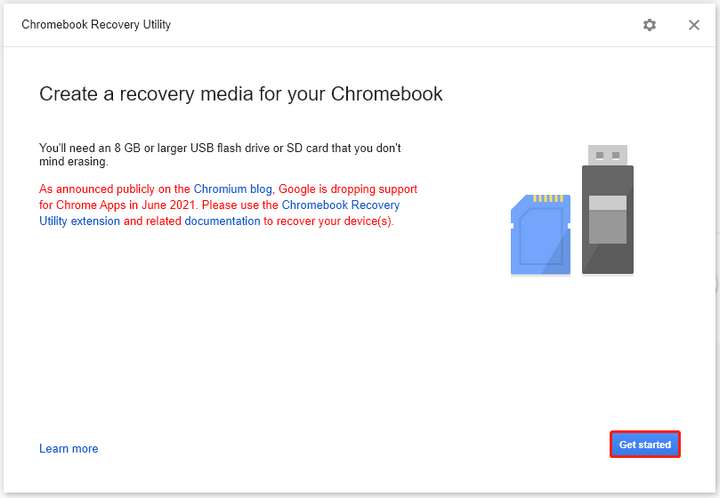
Step 2: Open the Chrome browser on your device, and then click here to locate the utility’s official website. Click on the Launch App button on the right side of the page. It can be found at the bottom of the page too.

Step 3: Click Get started to continue.
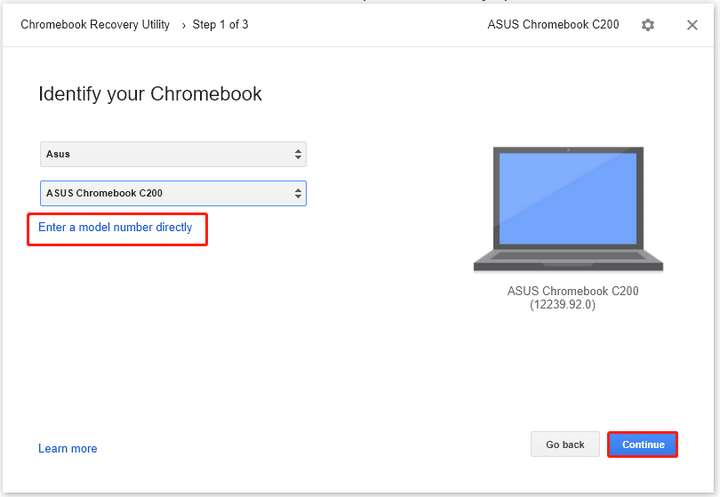
Step 4: In the next window, type the model number of your broken Chromebook, select the model number from the list, and then click Continue.
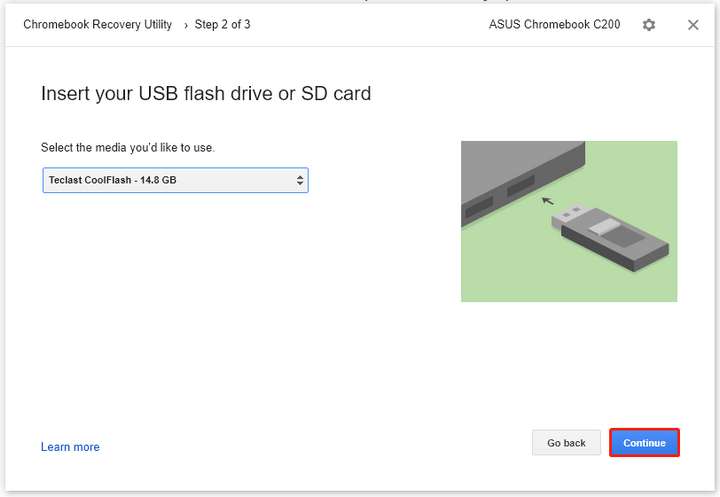
Step 5: Click on your USB drive from the drop-down menu and Continue.
Step 6: Once you click on the Create now button, the Chromebook Recovery Utility download process starts truly.
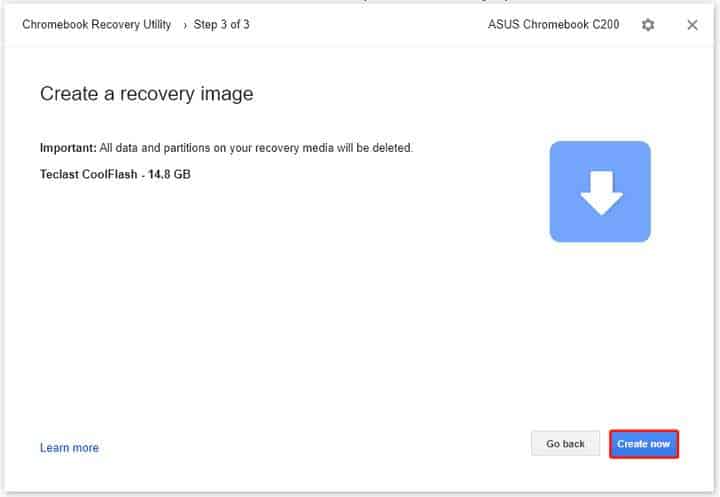
Step 7: Now, you need to wait for the finish of the process. When it shows you that the recovery media is ready, click the Done button and unplug the USB drive.
How to Use the Chromebook Recovery Utility
After the Chrome OS recovery image file is downloaded to the USB, you can repair your improper-running Chromebook. Here’s the fixing guide for you.
Step 1: Disconnect all the peripherals from the Chromebook first.
Step 2: Press the Esc + Refresh + Power keys simultaneously to enter the recovery mode.
Tip: On Chromebox or Chromebit, you can enter the recovery mode by pressing the Recovery button. For the tablet, press the Volume Up + Volume Down + Power buttons to access the recovery menu.
Step 3: You should plug the USB drive with the Chromebook Recovery Utility installed into the device after the “Chrome OS is missing or damaged, please insert a recovery USB stick or SD card” message appears on the screen.
Step 4: Follow the on-screen instruction to complete the operation.
Step 5: Remove the USB drive from the Chromebook after the operation ends. Then the device will restart automatically.
Conclusion
To sum up, this post mainly illustrates the Chromebook Recovery Utility download and usage. If your Chromebook runs improperly, download the Chrome OS recovery image file, fix the device with the given steps, and check the gry hazardowe za darmo!