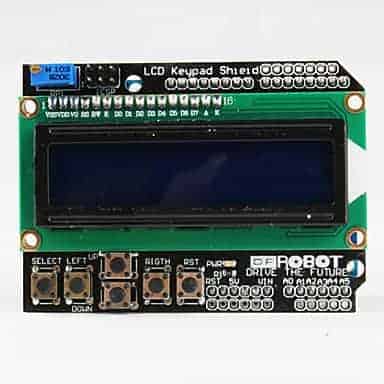
Recently I’ve got an Arduino LCD keypad shield. I haven’t decided yet where it will be used. But why not plug it into an Arduino board and see it working. The shield was initially introduced by DFRobot, who has some cool open-source stuff, including robotics-related.
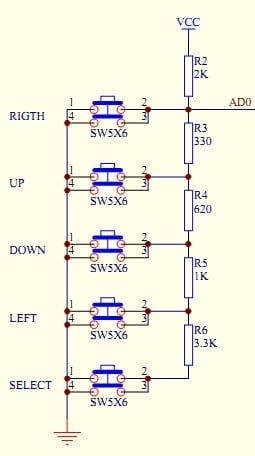
This LCD keypad shield is a cheap and convenient solution for adding 2×16 LCD and five push buttons (+1 reset) to Arduino design. LCD here is interfaced using 4-bit mode and occupies 4 (D4), 5 (D5), 6(D6), 7(D7), 8(RS), 9(E), and ten digital pins. Pin 10 is used to control the LCD backlight through the transistor key. All five buttons are connected to a single Analog pin 0 using a resistor-based voltage divider. This lets us keep other pins for general use. The shield is designed to work with 5V based boards.
Since Arduino already has an LCD library implemented in the core, it is easy to start using it right away by initializing LCD with a simple command:
LiquidCrystal lcd(8, 9, 4, 5, 6, 7);
But since there is a dedicated library for this shield, things become even simpler. All you need is to download one of the libraries. I suggest using LCDKeypad.zip, which simplifies the usage of LCD a bit and also implements key reading.
If we look at keys connected to analog pin 0, we will see that when any of the keys is pressed, we get a simple voltage divider. We can calculate the voltage drop with all known resistor values and supply voltage, so ADC reading for each key. There are ADC ranges used in the library to minimize error due to the variation of resistor values. Actually, you even don’t need a library for that since there is only one loop used to test the button. Let’s build a simple program where we would be able to adjust LCD backlight brightness:
#include <LiquidCrystal.h>
#include <LCDKeypad.h>
//contrast step
#define DELTA 10
LCDKeypad lcd;
//initial backlight
unsigned char bckl=150;
void setup(){
 pinMode(10, OUTPUT);
 analogWrite(10, bckl);
 lcd.begin(16,2);
 lcd.clear();
 lcd.print("    Aadjust");
 lcd.setCursor(0,1);
 lcd.print("   Backlight");
 delay(1000);
}
void loop(){
 int btn;
 lcd.clear();
 lcd.print("Up and down keys");
 lcd.setCursor(0,1);
 lcd.print("Backlight:");
 lcd.print(bckl);
//infinite loop of setting backlight
 while(1)
 {
 //wait for button
 lcd.blink();
 while ((btn=lcd.button())==KEYPAD_NONE)
 {
 }
 delay(50);
 lcd.noBlink();
 //wait for button release
 while(lcd.button()!=KEYPAD_NONE)
 {
 }
 //adjust the backlight
 if (btn==KEYPAD_UP)
    {
      if ((0xFF-DELTA)>=bckl)
        bckl +=DELTA;
      else bckl = 0xFF;
    }
    else if (btn==KEYPAD_DOWN)
    {
      if (DELTA<=bckl)
        bckl -= DELTA;
      else bckl = 0;
    }
 lcd.setCursor(0,1);
//clear second LCD line
 lcd.print("                ");
 lcd.setCursor(0,1);
 lcd.print("Backlight:");
 lcd.print(bckl);
 //set new backlight
 analogWrite(10, bckl);
 }
 }
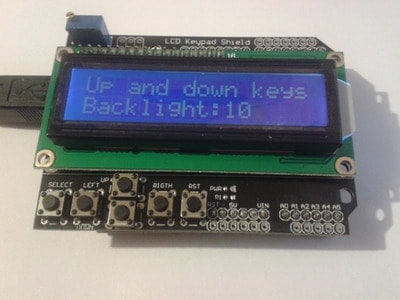
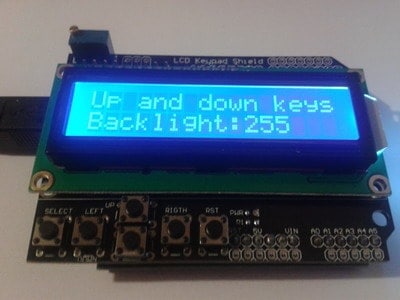
As you can see backlight of the LCD is changed by simply sending a PWM signal to pin 10 of Arduino. The minimum value is 0 which means the backlight of OFF and the maximum is 255 when LEDs are driven with a constant voltage. Here is the result of PWM set to 10 and 255 respectively:
The last thing I would like to mention that this shield has an awkward Reset button position. It is placed next to five user buttons that can be used as menu navigation keys and other purposes. The reset button is aligned dangerously close to user keys and can be accidentally pressed during operation.
Probably it would be better to place it anywhere else on PCB. Overall this is a great and robust shield that works fluently. It is up to you whether to use a library or achieve the same result with standard Arduino libraries. It shouldn’t be a problem to put this stacked assembly into a compact enclosure.


Yep it’s a nice shield, but with it using pins 4-10 it’s a huge pity that pins 11, 12 and 13 aren’t broken out. Only pins 3 and 4 are available to the user so it’s very limiting.
Haha cancel that previous comment: I just realised that the pins broken out at top-right include 11-13. Numbering from the right, those holes are 0, 1, 2, 3 (which I knew) and 11, 12 and 13 (which I just beeped out with my Fluke).
Yeah, all unused pins are broken out.
Thx to Jim,
how about the lower pin hole, are they represent A0-A5?
A1 to A5 can be used as there are holes. A0 is used by buttons.
Woo, that’s cool. Thx. just wonder why the shield give holes instead of pin holes.
Is it possible to use this shield on raspberry pi?
By connecting to the gpio.
Why not. Once you get RasPi talking to Arduino with USART, SPI or I2C you can do many crazy stuff.
Yeah… Good pieces of DIY project
Is there any way that the bckl value to be stored and be changeble, so if we reset the arduino will remember the value that we gave
Use EEPROM for that.