In this part, we are going to create a simple project for the MSP-EXP430FR5739 FRAM board. As development tools, we will use Code Composer Studio, which is free to up to 16KB Flash code size. MSP430FR5739 microcontroller has exactly 16KB of FRAM memory to use it all with no hustle.

Download Code Composer Studio (CCS) and install it on your PC. Then start the application and go to the workbench. It is an Eclipse-based IDE, so it should be no problem if you have used Eclipse before.
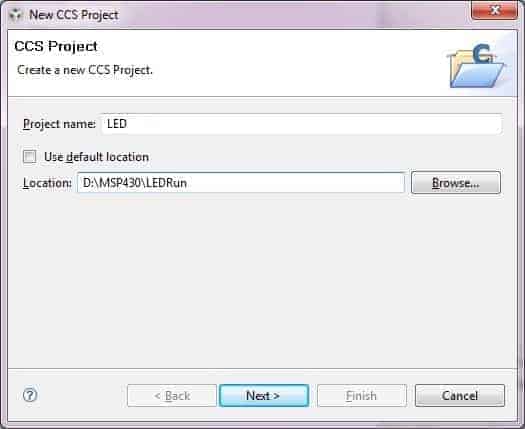
To create a new project go to File->New->CCS Project. You will be prompted to enter the project name and storage location.

We need to choose the MSP430 Project Type and select both- Debug and Release Configurations in the next window.

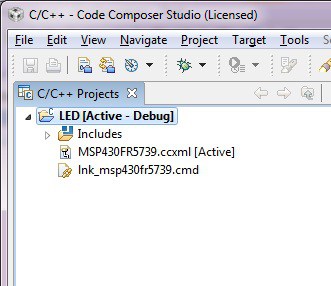
Click Next until you reach project settings. Here you select Executable output Type and in the device variant, select suitable microcontroller. In our case, we look up for MSP430FR5739 and then click Finish. And we end up with a project skeleton where Necessary includes are linked to the project:

Let’s create a new source file called main.c in the project main directory. It will be our main code file. For now, we are going to drive LEDs. Without messing main code, let’s put the LED-related function into a different source file called led.c with header file led.h. And put them into the Drivers directory in the project directory tree. First of all, let’s take care of the LED header file. Here we define PINs for each of 8 LEDs and write function prototypes as follows:

We need to initialize LED pins and then add several control functions like turning ON/OFF and toggling diodes. In the led.c file, we need to write actual functions. First of all, let’s deal with LEDInit function that has to enable LED connected pins as output and set initial LED states:
void LEDInit(void)
{
  //first four bits
  PJDIR |=LED1+LED2+LED3+LED4;
  //Leds Off
  PJOUT &= ~(LED1+LED2+LED3+LED4);
  //last four leds
  P3DIR |=LED5+LED6+LED7+LED8;
  //Leds Off
  P3OUT &=~(LED5+LED6+LED7+LED8);
}
In the MSP-EXP430FR5739 FRAM board, there are eight user-programmable LEDs four of them are connected to PORTJ pins 0..3, and another four are to PORT3 4..7 pins. LEDs are connected to GND via current limiting resistors:

Initially, we also need to set port pins to low, so LEDs were OFF.
To make the code a bit more compact, we are going to use an array of led pins:
//array of led pins
unsigned char leds[]={LED1, LED2, LED3, LED4, LED5, LED6, LED7, LED8};
This makes it easier to pass the LED number to control functions. Bellow, you can see the implementation of all three control functions:
void LEDOn(unsigned char LEDn)
{
    if ((LEDn>0)&&(LEDn<=4))
  {
      PJOUT |= leds[--LEDn];
  }
    if ((LEDn>4)&&(LEDn<=8))
  {
      P3OUT |= leds[--LEDn];
  }
}
void LEDOff(unsigned char LEDn)
{
  if ((LEDn>0)&&(LEDn<=4))
  {
      PJOUT &= ~leds[--LEDn];
  }
    if ((LEDn>4)&&(LEDn<=8))
  {
      P3OUT &= ~leds[--LEDn];
  }
}
void LEDToggle(unsigned char LEDn)
{
    if ((LEDn>0)&&(LEDn<=4))
  {
      PJOUT ^= leds[--LEDn];
  }
    if ((LEDn>4)&&(LEDn<=8))
  {
      P3OUT ^= leds[--LEDn];
  }
}
Now when we have drivers ready we can write the main program. This task becomes very simple:
#include "msp430fr5739.h"
#include "Drivers/led.h"
void main(void)
{
  unsigned char i;
  // Stop WDT
  WDTCTL = WDTPW + WDTHOLD;
  LEDInit();
  while(1)
  {
      //run through LEDs
      for(i=0; i<=8; i++)
      {
          LEDToggle(i);
          __delay_cycles(100000);
      }
  }
}
At the beginning of the main.c file, we need to include the device and our led driver headers. Then in the main routine, we initialize ports where LEDs are connected and then run an infinity loop that sweeps all 8 LEDs.
Now we can build our project by selecting Project->Build Active Project. After successful build compiler produces a .out file that will be programmed into Flash. The simplest way to program board is to run the debugger. For this, go to the menu Target->Debug Active Project. This will automatically load compiled file to flash memory and prepare an environment for debugging. You have two choices – run the debugger and analyze your program flow step by step where you can watch how each instruction is executed or leave debugger, reset your board and enjoy your new program.
Project source files: MSP-EXP430FR5739 FRAM board LED test run

