If you are just a beginner in electronics or just started learning Arduino – it is easy to get lost among hundreds of boards, electronics parts, and tutorials. You may already have an Arduino board to play with but still feel that there is no fun in learning as you need to search for suitable external parts and look for guides on how to solve specific problems. We can all agree that learning new things in a systematic and organized way gives maximum benefit. One of the easiest ways of learning electronics and programming microcontrollers is to start with Arduino. It is an open-source board that comes along with the development platform (IDE), where you can start writing and executing programs right away. Despite its simple look, Arduino is a very powerful microcomputer capable of performing different complex tasks. It may read a wide range of sensors, process data, and output results to displays and LEDs, run motors and servos. The limit is only your imagination.

The maker communities on the internet already have built millions of projects around Arduino. There are many types of Arduino boards available for different purposes. They come in various sizes featuring different processors and interfaces. The most recognizable is Arduino UNO featuring all necessary peripherals. The more advanced form AVR series is Arduino MEGA 2560, with a more powerful processor, more memory, and more pins for connecting external devices. To start learning Arduino, you should go with the starter kit to get all things assembled and organized in one place. At first, you may find it difficult to select between many kits available. The prices of most starting kits aren’t that different from being a significant factor for selection. It is better to look for benefits, features, and future expandability. Avoid low budget kits as they come with fewer components and less advanced sensors and actuators. They also feature smaller mainboards giving less processing power and connectivity. As you will get into learning and making, you will find that you need more flexibility and more ability to run your projects. Why not start small with a bigger kit and then evolve without the need for further investments.

The best and most optimal option is to select Elegoo EL-KIT-008 Mega 2560 Project, The Most Complete Ultimate Starter Kit, which has the best price and value. It comes with a powerful and large Arduino Mega 2560 board featuring plenty of connectors and peripherals. It is flexible and has plenty of room for both: programs and external devices that will become handy in later projects. The starter kit comes with more than 200 various components. All packed in one convenient box, which will keep everything organized.

The list is quite long but impressive and is worth mentioning:
- Component listing:
- 25pcs LED (white, yellow, blue, red, green)
- 1pcs RGB LED
- 10pcs Ceramic Capacitor(22pf & 104pf)
- 2pcs Photoresistor
- 1pcs Thermistor
- 5pcs Diode Rectifier (1N4007)
- 4pcs Electrolytic Capacitor (10UF 50V & 100UF 50V)
- 10pcs NPN Transistor (PN2222 & S8050 )
- 1pcs Tilt Switch
- 5pcs Button (small)
- 1pcs 1 digit 7-segment Display
- 1pcs 4 digit 7-segment Display
- 1pcs Sound Sensor Module
- 1pcs LCD1602 Module ( with pin header)
- 1pcs IC L293D
- 1pcs IC 74HC595
- 1pcs Active Buzzer
- 1pcs Passive Buzzer
- 1pcs RTC Module
- 1pcs DHT11 Temperature and Humidity Module
- 2pcs Potentiometer
- 1pcs Rotary Encoder Module
- 1pcs Joystick Module
- 1pcs Keypad Module
- 1pcs 5V Relay
- 1pcs IR Receiver Module
- 1pcs MEGA2560 Controller Board
- 1pcs Breadboard
- 1pcs Servo Motor (SG90)
- 1pcs Stepper Motor
- 1pcs ULN2003 Stepper Motor Driver Board
- 1pcs Prototype Expansion
- 1pcs Power Supply Module WARNING: Pls. do not use the voltage higher than 9V
- 1pcs HC-SR501 PIR Motion Sensor
- 1pcs Ultrasonic Sensor
- 1pcs GY-521 Module ( with pin header)
- 1pcs 3V Servo Motor
- 1pcs MAX7219 Module
- 1pcs Remote
- 1pcs 9V 1A Power Supply
- 1pcs 65 Jumper Wire
- 1pcs Water Lever Sensor
- 1pcs USB Cable
- 1pcs 9V Battery with DC
- 1pcs RC522 RFID Module
- 120pcs Resistor (10R/100R/220R/330R/1K/2K/5K1/10K/100K/1M)
- 20pcs Female-to-male Dupont Wire
With that kit, you also get a tutorial CD featuring 35 lessons to start. All you need is to open a document and follow the step by step lesson to build your first project. The documentation also includes code examples for all projects with necessary libraries that may not be included in Arduino IDE. Explore the included contents for more valuable information on electronics and components included in the kit.
With included documentation, learning becomes much more comfortable even without any prior electronics knowledge. Once you get used to it, you won’t need guides as the tinkering becomes secure and robust.

Using the kit, it is fun to work and learn in groups. Therefore the kit is popular in maker groups and school circles. It may be an excellent gift for someone who loves DIY. It is a robust tool to make something entirely new. With its potential, the kit manages to appeal to a beginner or a professional of any level. Anyone interested in building, programming, and improving things will find the necessary tools in the box. It will help to supercharge anyone for lots of great projects.
A few great benefits if you choose Elegoo EL-KIT-008 Mega 2560 Project The Complete Ultimate Starter Kit:
- Comes with powerful Arduino Mega 2560 board
- Includes a large number of simple and complex electronics components
- Provides documentation to build 35 projects right away
- Has few advanced parts that you may not find in other kits. The stepper motor, keypad input, water sensor, ultrasonic, and PIR sensor are only a few from many.
- The kit comes in a handy and well-organized plastic box.
- Great price for value
The overall impression of the Elegoo starter kit is excellent. With many simple and complex components, a novice or advanced maker will find its use in many exciting projects such as robotics, weather monitoring, home control, and fun.
Demo project – RGB LED control
Here we perform a replica of lesson 4 from the Elegoo CD. The documentation is extensive on how LEDs work and how to control them using PWM signals. It also explains how red, green, and blue color mixing works to get any color you want. The demo’s circuit is straightforward – on the breadboard, you need to connect RGB LED through three 220Ohm resistors on each color anode.

Each LED line connects to Arduino pins
- BLUE – 3
- GREEN – 5
- RED – 6
LED Cathode connects to GND pin. That’s it for the circuit. All you need is to load source code from the example folder Lesson 4 RGB LED and upload it to the board.

The demo runs through all possible colors by changing PWM signals on each LED line.
Example project using Elegoo kit – ultrasonic distance meter with LCD
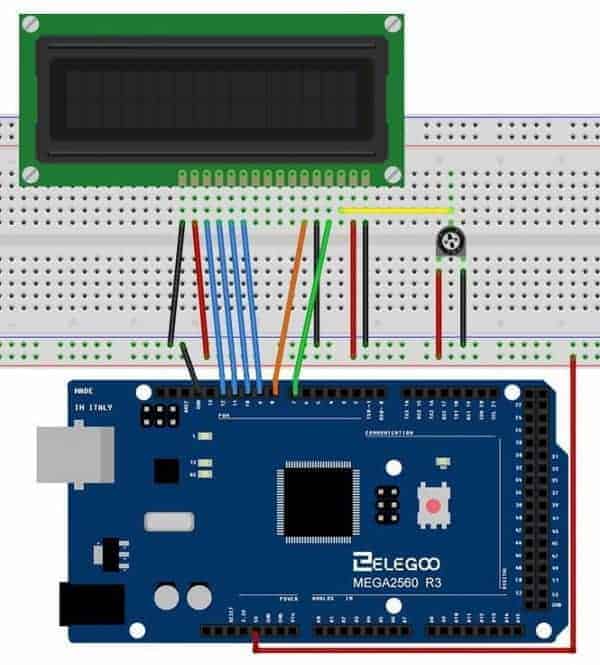
This project is similar to the 10th project example, but instead of displaying the distance vie serial interface, it will be shown on LCD. For this project, we will need an Arduino MEGA 2560 board, an Ultrasound sensor module, LCD, 10k potentiometer, breadboard, and few jumper wires to connect everything into the working circuit.
First of all, let’s connect LCD to Arduino using Breadboard and jumper wires. LCD is connected as in lesson 22

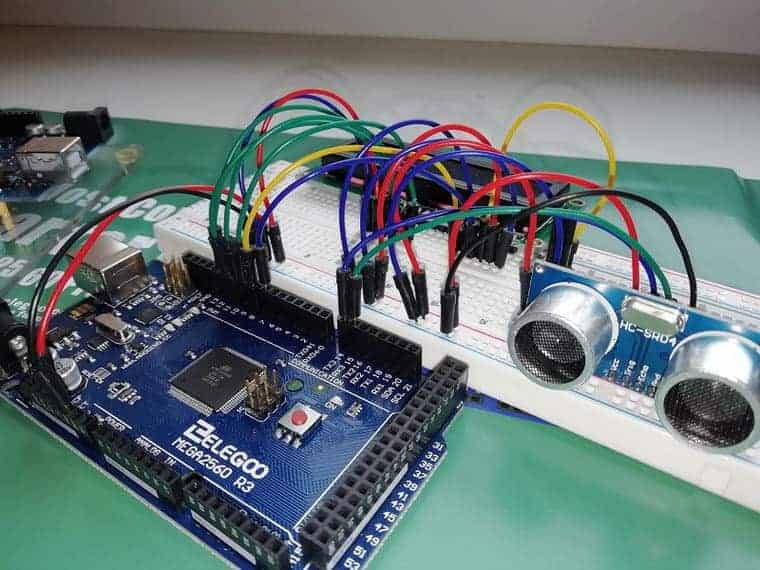
And the other part is the Ultrasonic sensor connection. Since pins 11 and 12 are already occupied by LCD, we moved them to 14 and 15.

The connected board looks as follows.

We need to merge source codes from LCD and distance meter code examples to get it working as we want.
// include the library code:
#include <LiquidCrystal.h>
#include "SR04.h"
#define TRIG_PIN 14
#define ECHO_PIN 15
SR04 sr04 = SR04(ECHO_PIN,TRIG_PIN);
long a;
// initialize the library with the numbers of the interface pins
LiquidCrystal lcd(7, 8, 9, 10, 11, 12);
void setup() {
  // set up the LCD's number of columns and rows:
  lcd.begin(16, 2);
}
void loop() {
  //get distance
  a=sr04.Distance();
  lcd.setCursor(0,0);
  lcd.print("D:");
  lcd.print(a,1);
  lcd.print("cm  ");
  delay(500);
}

Final word
Elegoo kit brings lots of great stuff that you can try right away without putting too much thought into it. But the real fun begins when you start building something that is not documented. Once you attempted all demos, start combining multiple sensors into one project. For instance, create a weather station that measures temperature, humidity, rain intensity with a water level sensor and a DIY wind speed meter. Display values on LCD, via serial interface, or indicate using LEDs. If you have other sensors and components that are not in the kit – try to interface them as well. It could be that you already have an Ethernet or WiFi module – this is a first step into the project’s internet.
The other idea to give a try could be combining a motion sensor, ultrasonic distance meter, an RFID tag reader, keypad, and servo motor into a primary home security system. Involve all family in the building process and enjoy the results.

