Integral Hall sensors
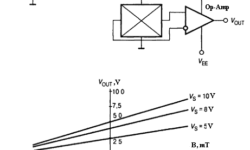
Hall sensors are common sensors of many measuring devices, including linear or angular motion, magnetic field, current, etc. The main convenience of hall sensors is that they don’t have to be mechanically connected to objects. They are also simple, cheap, which makes them attractive in the automotive, manufacturing, and aviation industries. Many manufacturers produce hall sensors: Honeywell, Melexis, Allegro Microsystems, Micronas Intermetall, Siemens, Analog Devices, etc. A typical circuit for connecting Hall sensors One of the simplest is linear Hall sensors that are used for measuring magnetic field strength. Integral hall sensors include a sensor signal amplifier, also temperature compensation, and supply stabilization circuits. Sensor output signal voltage and polarity depend on magnetic field strength and direction. If there is no magnetic field near the sensor, then output is equal to zero. To achieve this differential amplifier has to be used, characteristics will be corrected to be output voltage zero when there is no magnetic field. Other groups of hall sensors have comparator built-in. This allows having digital level signals on output. There can be two types of such hall devices: switches and triggers.