Probably many of you (including me) are using Programmers Notepad or AVR Studio to set up AVR projects. Each of them has advantages and disadvantages. For instance, Programmers, Notepad is a great GUI, but there are many manual routines required to start compiling projects – like setting up makefile, creating file dependencies, etc. AVR Studio is a great solution that generates makefiles automatically, and it has a great simulator for immediate debugging. So why would we need another IDE? Actually, Eclipse IDE is one of the best open-source tools that programmers widely use – so it is optimized for managing projects, code writing with auto-complete functionality. So why not give it a try.

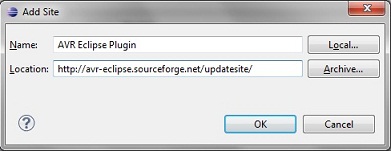
So let’s set up an Eclipse environment to work with AVR. First of all, let’s download Eclipse from https://www.eclipse.org/downloads/ site. Choose Eclipse IDE for C/C++ Developers as we want to program AVR in C. Open it (no need to install), then go to HELP->Install New Software… Click Add… and in the Add Site dialogue box, enter the URL where the AVR Eclipse plugin is located (https://avr-eclipse.sourceforge.net/updatesite/ )
After confirmation you should see AVR Eclipse Plugin ready to download in the details area:

Click next and then accept term of license agreement to start download.

After plugin is downloaded you will need to restart Eclipse to make it working.
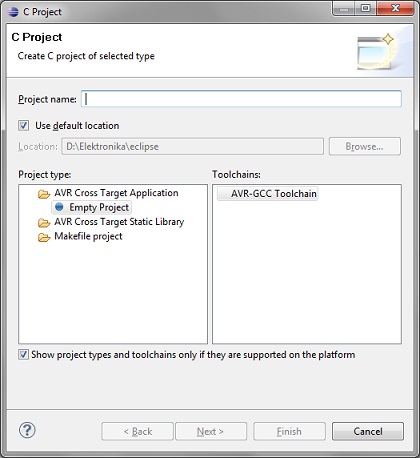
If you already have WinAVR on your machine, you can start a new project. For this, Go to File->New->C Project. Select Empty Project in AVR Cross Target Applications and enter Project name, which also serves as a new project folder in the desired location.
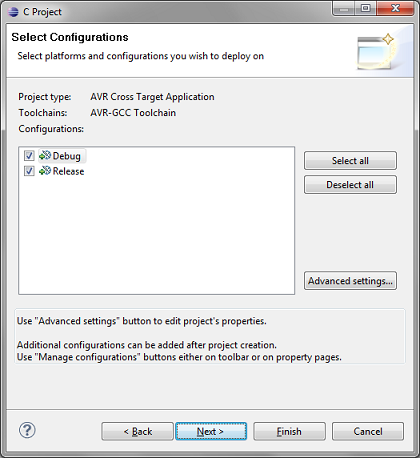
After pressing Next, you will have to select configurations whether you want to debug or generate a hex file. Let’s leave both (debug and release) configurations selected.
Click Next… and then select Microcontroller and its working frequency.
So your project is set up, you can start writing a program for your AVR. Go to File->New->Source File to add a blanc C file like main.c where your program will be stored. This way, you can add more files to the project tree. If you have some independent library files – upload them to the project directory, and dependencies will be generated automatically.
If you have some program ready to run, next will be to build a project and flash the chip with some programming tool.
To build project just go to Project menu and select Build All.
I have used usbasp adapter that works well with avrdude. Go to menu Project->Properties, then go to AVR->AVRDude. Here you can select programmer type, fuse settings, lock bits, and other features supported by the adapter. To select programmer type, click New near Programmer configuration. In a new window, you will be given all list of programmer hardware supported by avrdude. For usbasp select USBasp, https://www.fischl.de/usbasp/, and press OK.
To start uploading firmware, go to menu AVR and select Upload Project To Target Device. And you should see AvrDude action in the console tab:
If you are familiar with WinAVR and AVR Studio combination, starting to work with eclipse should be intuitively easy.
One great feature of the AVR Eclipse Plugin is Fuse and Lock bits settings. It has a great interface for fuse selection. Here you can select various ways of setting AVR fuses, including leaving as it is, loading fuse settings from file, and direct setting. All fuse settings you can see in the Fuse preview window while editing. This is really handy to double-check values before uploading to the chip.
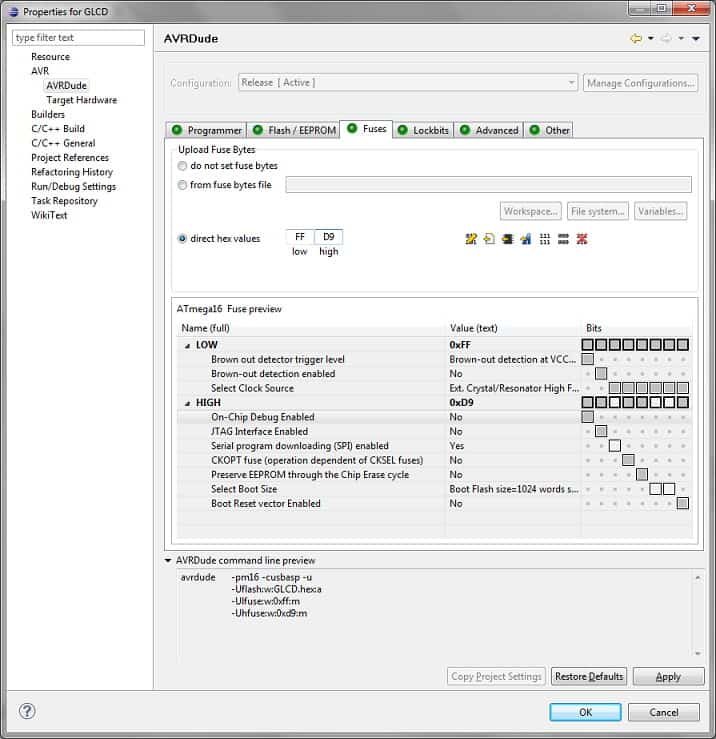
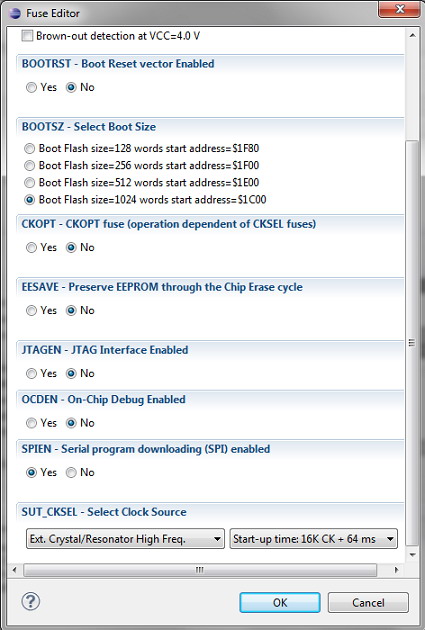
Editing of direct values has a couple of precious features. One of them is Load from MCU – which loads current fuse settings from the chip. And another is the Fuse editor, which offers a visual fuse setting interface.
This allows no messing with hex numbers, and you are really sure what you’ve selected. We all know that AVR fuse settings probably are the most complicated part for AVR starters and not only…
Overall AVR eclipse plugin offers really nice interface for complete project development. You say it has no simulator or debugger. The eclipse itself doesn’t, but WinAVR has. You can configure Eclipse to use the SimulAVR tool to simulate a project or AVaRICE to debug via the JTAG interface. Thumbs up to this great tool.
Of course, it is impossible to cover all features AVR Eclipse Plugin offers. All information and support you can get at the AVR_Eclipse_Plugin site.


