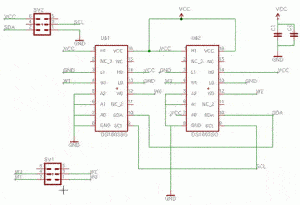
You’re still frustrated with your old-fashioned and limited functions potentiometer? Instead of being annoyed by it, why don’t you spend several hours making a DS1803 digital potentiometer?
With this DS1803 digital potentiometer, you can easily control the resistance over its range in the programmable action and then send it commands over a 2-Wire (12C/TWI) serial interface in a second!
This means you can hook it up to another microcontroller, such as the most popular Arduino, and then adjust the program’s resistance. It would be best if you chose DS1803 because it is compatible with the program, it can be operated in either 3V or 5V, and you can choose from a few different models with various resistance ranges.

For the project, you can create a tiny PCB, were consists of two DS1803s. You will get four potentiometers on this board since each of the DS1803 has two potentiometers!
The DS1803 has a very straightforward controlling code, and each of the codes is addressable over the 2-Wire interface. Basically, you can be expected up to eight individually addressable DS1803s on one interface (Yeah, you’ll save a lot of money here, don’t you like it?).
Below here is the code for the project:
//
// Control the DS1803 Digital Potentiometer
#include <Wire.h>
void setup()
{
  Wire.begin(); // join i2c bus (address optional for master)
}
byte val = 0;
void loop()
{
  Wire.beginTransmission(0x28); // transmit to device 0x28)
  Wire.send(0xAA);            // sends instruction byte,
                               // write to potentiometer-0
  Wire.send(val);             // sends potentiometer value byte
  Wire.endTransmission();     // stop transmitting
   val++;        // increment value
  if(val == 150) // if reached 64th position (max)
  {
    val = 0;    // start over from lowest value
  }
  delay(100);
}
I hope you all will enjoy this fun and exciting project.

